


My last couple of articles have featured a demo app
affectionately named Something Not Entirely Unlike Access. The
application employs a variety of methods to obfuscate the "Accessian"
features. Last
month, we discussed how to automatically resize subforms, the way some
browser frames work. This month, we’ll tackle navigation.
Once again, the download
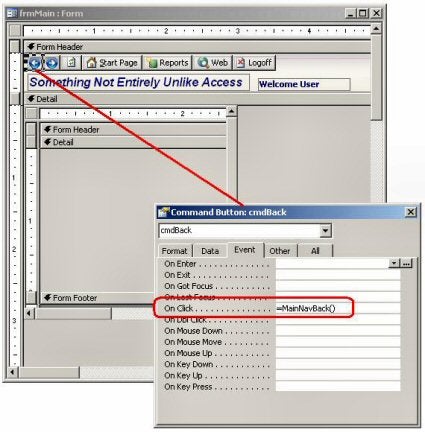
is the same as last two month’s. The screen shot below displays the main form
in design view, and you’ll notice the Internet Exploreresque Forward and Back
buttons in the upper left corner. Programming the logic behind their navigation
is this month’s project.
The Easy Piece
Let’s get the easy piece out of the way. The form has at
least three buttons: one to navigate back, one to navigate forward, and a Home
or Start Page button. The images were easy to create using MSPaint and a screen
shot of Internet Explorer. Once you have an image you like, just assign it to
the [Picture] property of the button.
As shown in the screen shot, I’ve used the technique whereby I assign a public
function to the OnClick event. (A public sub should work in newer versions of
Access, but I believe even Access 2000 would not recognize the assignment
unless it was a Function, not a Sub.) So by clicking the back button, a
function on frmMain called MainNavBack() is executed. The code for these
functions, MainNavBack() and MainNavForward(), is shown below.
Each of these functions calls another function on frmMain named LoadMainSubform().
This process was described in my
June article, which introduced the Something Not Entirely Unlike
Access application. Accordingly, we won’t go into detail on what this
function does, but suffice it to say that, given the name of a form, it loads
and resizes that form into the single subform object on frmMain, effectively
changing pages.
This month’s trick will be logging page visits and then determining the correct
page to load when users click Back or Forward. To do this, we create and
implement our own navigation class, named clsNavigation. We’ll show the code
for the class a little later, but first let’s show how it’s used.
Implementation in the form requires these steps:
- Declare a module level object of type clsNavigation using
the NEW modifier. - Call the object’s Load method in the form’s Open event.
- For each new page, call the object’s AddNavPage method to
log the visit. - Create a function to call the object’s NavPrevPage method
to find the previous page. - Create a function to call the object’s NavNextPage method
to find the next page.
That’s all we have to do on the form. Our work is done here.
The real logic exists in the class, clsNavigation. So long as you have the
above five steps implemented correctly in the form, everything else depends on
the class module, which you may freely import into your application from the
download code. You’ll need to tweak it a little to get it to work, but it’s all
there, and more.
    ' First, create a module level navigation object of
    ' type clsNavigation.  (this class does not yet exist
    ' ... we will be building it shortly.)
    Private m_objNav As New clsNavigation

    Private Sub Form_Open(Cancel As Integer)
        On Error GoTo Err_Handler

        ' Create class to manage navigation controls
        m_objNav.Load

        ' do other Form Open stuff here ...
    End Function

    Public Function MainNavBack() As Boolean
        On Error GoTo Err_Handler
        Dim strPage As String

        strPage = m_objNav.NavPrevPage
        Call LoadMainSubform(strPage, False)
    Exit_Here:
        Exit Function
    Err_Handler:
        MsgBox Err.Description, vbCritical
        Resume Next
    End Function

    Public Function MainNavForward() As Boolean
        On Error GoTo Err_Handler
        Dim strPage As String

        strPage = m_objNav.NavNextPage
        Call LoadMainSubform(strPage, False)
    Exit_Here:
        Exit Function
    Err_Handler:
        MsgBox Err.Description, vbCritical
        Resume Next
    End Function

    Public Sub LoadMainSubform(ByVal sFormName As String, _
                               ByVal fLogNav As Boolean    )
        On Error GoTo Err_Handler

        ' Update the navigation object with the new page,
        ' unless the LogNav flag is set to False. This
        ' give you flexibility to skip logging for some pages.
        If fLogNav = True Then m_objNav.AddNavPage sFormName

        ' continue with process of loading form ...
    End Function
Creating and Loading The Navigation Class
Technically, the Navigation class is created above in the
declaration. When the module level variable, m_objNav, is declared with the New
modifier, the class is instantiated and ready to use. Because it is a module
level variable, it persists as long as frmMain is open.
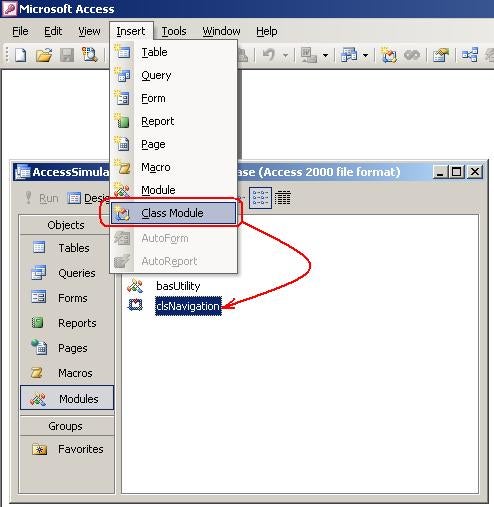
To build the class, you need to select Class Module from the Insert
menu option. A Class module is different from a Standard module, so be sure
that all the code that follows goes into a Class Module. When the above-mentioned
variable, m_objNav, is declared, an instance of the class is created. (Notice
that the icon for a Class module is different from the icon for a Standard
module.)
While an instance of the class may exist in m_objNav, it can’t really do
anything until the Load method is called. Loading the class does little more
than create an in-memory ADO recordset, into which we will load our data. The
code looks like this …
Option Compare Database
Option Explicit

Private c_rstNav As ADODB.Recordset
Private c_intCurrItem As Integer
Private c_intMaxItem As Integer
Private c_fMovedBack As Boolean

    Public Sub Load()
        On Error GoTo Err_Handler

        ' Instantiate the private level ADO recordset object, add
        ' as many fields as you'd like, and load the first record.
        Set c_rstNav = New ADODB.Recordset
        With c_rstNav
            .Fields.Append "ItemID", adInteger
            .Fields.Append "Value", adVarChar, 64
            .Fields.Append "CustomerID", adVarChar, 5
            .Fields.Append "EmployeeID", adInteger
            .Fields.Append "ProductID", adInteger
            .Fields.Append "OrderID", adInteger
            .Fields.Append "URL", adVarChar, 512
            .Open

            ' Note that I have added various IDs to the recordset.
            ' These will be used to load the correct record.
            ' I always include functions to set and get these IDs.
            '
            ' This could be recoded to be more flexible, but since
            ' the demo app uses this format, I'll let it be for now.

            .AddNew
            !ItemID = 0
            !Value = "frmStartPage"
            !CustomerID = GetCustomerID()
            !EmployeeID = GetEmployeeID()
            !ProductID = GetProductID()
            !OrderID = GetOrderID()
            .Update
        End With

    Exit_Here:
        Exit Sub
    Err_Handler:
        MsgBox Err.Description, vbCritical
        Resume Next
    End Sub
The class is now loaded. The private ADO recordset,
c_rstNav, exists and contains a single, initial record. This recordset will
persist so long as the class persists. The class persists as long as the form
is open. So, we’ve created a little in-memory log book of the pages visited by
our user.
Adding a Page
The next action we need to code is the adding of a page. Of
course, we need to log the page’s name, but we’re also going to need some
additional information. For example, if we just navigated to frmCustomer, we’re
also going to need to know WHICH customer, that is, what was the CustomerID at
the moment the form was loaded?
Once again, having considered my previous articles would be of benefit, but in
a nutshell, here’s how I load forms: When the user double-clicks on, for
example, the row of the Customers List Subform, the current row’s CustomerID is
saved by means of the SetCustomerID() public function. When the form is loaded,
it uses the GetCustomerID() method to determine which record to load. So, at
the time the page is "navigated to," the CustomerID is known and can
be persisted in our navigation object. The same is true for EmployeeID,
ProductID, OrderID or URL, if the form is loading a web page.
Now, I should be ashamed of myself for this clumsy and non-extensible code. It
would have been much better to have only two columns: KeyFieldName and
KeyFieldValue. These could be reused more efficiently. When the frmCustomer is
loaded, the [KeyFieldName] would be set to the text "CustomerID" and
the [KeyFieldValue] to its value. When frmEmployee is loaded, [KeyFieldName]
would be "EmployeeID" and [KeyFieldValue] would contain the current
EmployeeID. This would have been smart, but as it turns out, that’s not how the
demo code works, so I won’t bother tweaking it now, but as you can see from the
code below, it’s pretty simple to modify this navigation recordset. Add and/or
remove fields as you wish. Play with it … it’s fun.
The AddNavPage() method has some tricks to it. First, the argument, sValue,
must exist. This part of the code could be smarter too, by checking to see that
a form actually exists by the name passed in sValue.
In order to behave as Internet Explorer does, the FlushForward method must be
called each time a page is added. It basically resets the recordset to make the
current page the last record. It’s like with IE (or any other browser) when you
navigate back three or four pages, and then go to a new page. The browser dumps
any knowledge of those pages and starts off on a new path, with the current page
becoming the last in the string of pages.
Next the c_rstNav recordset object is manipulated to locate our starting point,
the last ItemID and value in its set. The strLastValue variable is used to
avoid adding rows for the same page multiple times. (The Refresh or Requery
action of the form may trigger this method and we don’t need to log those
events.) I’ve also added a condition to allow for logging of multiple pages so
long as the form is frmIE, which is a browser control.
Once the record is successfully saved, we increment the class variables
c_intMaxItem and c_intCurrItem, which will be used later when locating the
requested navigation page. At this point, our page is logged in the recordset,
and the class properties are set.
Public Sub AddNavPage(ByVal sValue As String)
        On Error GoTo Err_Handler

        Dim intLastItem As Integer
        Dim strLastValue As String

        If Trim(sValue) = "" Then
            Exit Sub
        Else
            Call FlushForward

            With c_rstNav
                If Not .EOF Then .MoveLast Else .MovePrevious
                If Not .BOF Then
                    intLastItem = !ItemID
                    strLastValue = !Value
                End If

                ' Always log IE browser pages.
                If sValue <> strLastValue Or sValue = "frmIE" Then
                    .AddNew
                    !ItemID = intLastItem + 1
                    !CustomerID = GetCustomerID()
                    !Value = sValue
                    !EmployeeID = GetEmployeeID()
                    !ProductID = GetProductID()
                    !OrderID = GetOrderID()
                    !URL = GetURL()

                    On Error Resume Next
                    .Update
                    If Err.Number = 0 Then
                        c_intMaxItem = c_intMaxItem + 1
                        c_intCurrItem = c_intMaxItem
                    End If
                End If
            End With
        End If

    Exit_Here:
        Exit Sub
    Err_Handler:
        MsgBox Err.Description, vbCritical
        Resume Next
    End Sub
Retrieving A Page
The code for NavNextPage is shown below, but NavPrevPage is
nearly identical. All this code needs to do is locate the previous or next
record in the recordset and extract the form name and associated IDs. This is
where that class variable, c_intCurrItem, comes into play. The Find method is
used with the c_rstNav recordset to locate c_intCurrItem. Once found, the
values of the row are read and the form name is returned by the function.
    Public Function NavNextPage() As String
        On Error GoTo Err_Handler

        Dim strOut As String

        c_intCurrItem = c_intCurrItem + 1
        If c_intCurrItem > c_intMaxItem Then
            c_intCurrItem = c_intMaxItem
            strOut = "-1"
        End If

        With c_rstNav
            If Not .BOF Then .MoveFirst
            .Find "[ItemID]=" & c_intCurrItem
            If Not .EOF Then
                strOut = !Value
                SetCustomerID Nz(!CustomerID, "")
                SetEmployeeID Nz(!EmployeeID, 0)
                SetProductID Nz(!ProductID, 0)
                SetOrderID Nz(!OrderID, 0)
                SetURL Nz(!URL, "http://www.amazecreations.com/datafast/")
            End If
        End With

    Exit_Here:
        NavNextPage = strOut
        Exit Function
    Err_Handler:
        MsgBox Err.Description, vbCritical
        Resume Next
    End Function
Final Thoughts
In reviewing the code, I can’t help but think that I’ve
over-complicated the process and over-simplified the explanation. That having
been said, I still think this code may be of benefit to readers. It can be
improved upon, it’s true and it will take some concentration to read and
understand all that is taking place, but that’s what programming is about. It’s
not perfect, but it’s a start.