


This excerpt, extracted from Microsoft Access 2010 Inside Out packs hundreds of time-saving solutions, troubleshooting tips, and workarounds, all in concise, fast-answer format.

|
Microsoft Access 2010 Inside Out ByJeff Conrad, John Viescas Publisher:Microsoft Press Released:August 2010 Pages:1488 |
Exploring the Access 2010 Interface Table of Contents
-
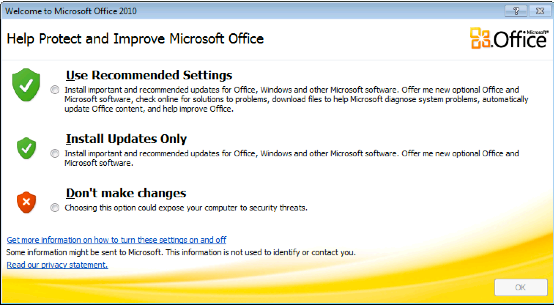
After selecting your options in the Privacy Options
dialog box, you can always alter these settings later. For more information on
changing these settings, see Modifying
Global Settings via the Access Options Dialog Box.Caution
If you are in a corporate
network environment, you should check with your Information Technology (IT)
department to determine whether your company has established guidelines before
making selections in the Privacy Options dialog box.Getting Started with Access 2010
If you are a seasoned developer
with the 2007 version of Access, the user interface of Access 2010 should be
familiar to what you’ve been working with. If however, you have been working
only in Access versions before 2007, be prepared for quite a shock when you
first open Access 2010. Microsoft revamped the entire look and feel of the user
interface in Access 2007 and made additional changes in Access 2010 and the
other products in the Office 2010 release. To some degree, users of versions
before Access 2007 will have a challenging task adjusting to all the changes
the development team has incorporated into Access 2007 and Access 2010. If you
are one of these users, you might even experience a short-term decrease in
productivity as you become accustomed to where commands and tools are located
on the new user interface elements called the Backstage view and the ribbon.
(See Exploring the Microsoft
Office Backstage View, for details about the Backstage view, and Understanding
the Office Fluent Ribbon, for details about the ribbon.) For first-time
users of Access, Microsoft continues to spend a great deal of development
effort trying to make the "Access experience" easier and more
intuitive in this version. With a new
Getting Started screen, a host of ready-to-use client and web database
applications available, and a context-driven, rich graphical ribbon and
Backstage view, users will have an easier and quicker time creating professional-looking
database applications.On first starting Access, you see a
new Getting Started screen on the New tab of the Backstage view, as shown in Figure
2-2. We will discuss all the elements of this New tab and the
Backstage view in great detail in Exploring the Microsoft
Office Backstage View.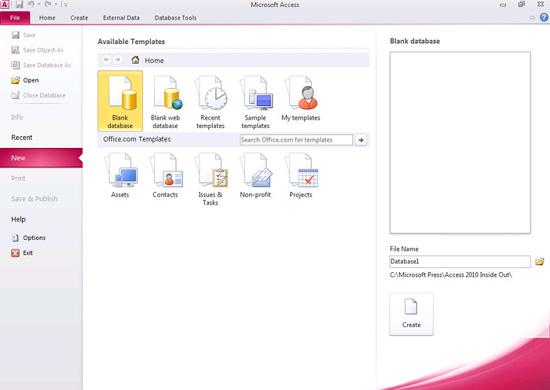
Figure 2-2. When you first open Access 2010, you can see the new Backstage view.Opening an Existing Database
To showcase the user interface, let’s
take one of the template databases out for a test drive. Using the
TasksSample.accdb database on the companion CD, based on the Microsoft Tasks
template, we will highlight some specific areas of Access 2010. First, follow
the instructions at the beginning of this book for installing the sample files
on your hard drive. Click the Open button on the left side of the Backstage
view to see the Open dialog box shown in Figure
2-3.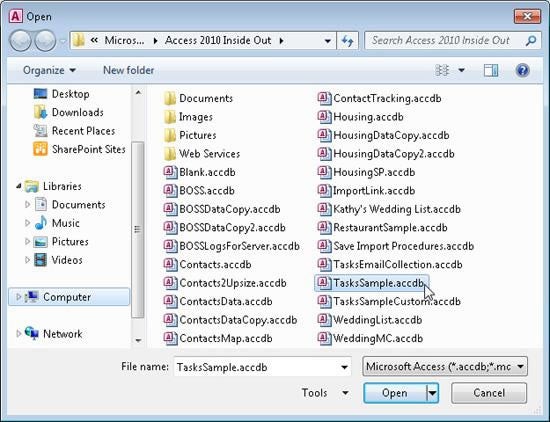
Figure 2-3. You can use the Open dialog box to find and open any existing database file.In the Open dialog box, select the
TasksSample.accdb file from the folder in which you installed the sample
databases, and then click OK. You can also double-click the file name to open
the database. (If you haven’t set options in Windows Explorer to show file name
extensions for registered applications, you won’t see the .accdb extension for
your database files.) The Tasks sample application will start, and you’ll see
the startup form for the Tasks Sample database along with all the various
database objects listed on the left side, as shown in Figure
2-4.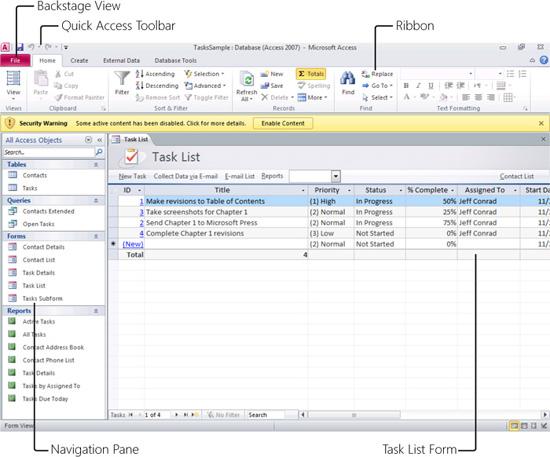
Figure 2-4. When you
open the Tasks Sample database, you can see the user interface for Access 2010.Note
If
you installed the sample files for this book in the default location from the
companion CD, you can find the files in the Microsoft Press\Access 2010 Inside
Out folder on your C drive.We will discuss each of the Access
2010 user interface elements in greater detail in the following sections, but
for now, here is a brief overview of the different elements. The upper-left
corner of the screen contains a tab called File. This tab, called the Backstage
view, replaces the Microsoft Office Button from Access 2007. Above this tab are
a few smaller buttons on what is called the Quick Access Toolbar. This toolbar
holds frequently used commands within Access 2010. Beneath the Quick Access
Toolbar is a series of four tabs (Home, Create, External Data, and Database
Tools) that contain many commands, options, and drop-down list boxes. These tabs
are on what Microsoft refers to as the Office Fluent Ribbon and it replaces
menu bars and toolbars from versions of Access before 2007. You will interact
heavily with the ribbon when developing and using Access 2010 databases because
most of the commands you need are contained on it.Beneath the ribbon is a small
message that says "Security Warning." This Message Bar
informs you if Access has disabled potentially harmful content in this
database. See Understanding Content Security, to
learn what this message means and what you can do to avoid it.On the left side of the screen is
the Navigation pane, which replaces the Database window from versions of Access
before 2007. In the Navigation pane, you can find all the various database
objects for this database (tables, queries, forms, and so on).To the right of the Navigation pane
is where your database objects open. In Figure
2-4, you see that the Task List form is open. All possible views of
your database objects appear in this area. Just beneath the Navigation pane and
main object window is the status bar. The status bar displays text descriptions
from field controls, various keyboard settings (Caps Lock, Num Lock, and Scroll
Lock), and object view buttons.