


The
Need for Standby Servers
In a perfect world
we wouldn’t need standby servers for our SQL Servers. Our
hardware would never fail, NT Server 4.0 or Windows 2000 would
never blue screen, SQL Server would never stop running, and our
applications would never balk.
In a partially
perfect work, we could afford very expensive clustered SQL
Servers that automatically failover our wounded and dead
production SQL Servers, reducing our stress and keeping our
users very happy.
But for most of
us, the closest thing we can afford to implement when it comes
to SQL Server failover are standby servers that we have to
manually fail over. And even some of us can’t afford this. But
for this article, I am going to assume that you can afford a
standby server.
The concept of
standby servers is not a new one. It has been around a long time
and been used by many DBAs. Traditionally, using a standby
server for failover has involved manually making database and
log backups on the production server and then restoring them to
the standby server on a regular basis. This way, should the
production server fail, then users could access the standby
server instead, and downtime and data loss would be minimized.
This article is
about log shipping, a refined variation of the traditional
manual standby failover server process. Its two major benefits
over the traditional methods is that it automates most of the
manual work and helps to reduce potential data loss even more.
What
is Log Shipping
Essentially, log
shipping is the process of automating the backup of database and
transaction log files on a production SQL server, and then
restoring them onto a standby server. But this is not all. The
key feature of log shipping is that is will automatically backup
transaction logs throughout the day (for whatever interval you
specify) and automatically restore them on the standby server.
This in effect keeps the two SQL Servers in "synch".
Should the production server fail, all you have to do is point
the users to the new server, and you are all set. Well, its not
really that easy, but it comes close if you put enough effort
into your log shipping setup.
Benefits
of Log Shipping
While I have
already talked about some of the benefits of log shipping, let’s
take a more comprehensive look:
-
Log shipping
doesn’t require expensive hardware or software. While it is
great if your standby server is similar in capacity to your
production server, it is not a requirement. In addition, you
can use the standby server for other tasks, helping to
justify the cost of the standby server. Just keep in mind
that if you do need to fail over, that this server will have
to handle not one, but two loads. I like to make my standby
server a development server. This way, I keep my developers
off the production server, but don’t put too much work load
on the standby server. -
Once log
shipping has been implemented, it is relatively easy to
maintain. -
Assuming you
have implemented log shipping correctly, it is very
reliable. -
The
manual failover process is generally very short, typically
15 minutes or less. -
Depending on
how you have designed your log shipping process, very
little, if any, data is lost should you have to failover. The amount of data loss, if
any, is also dependent on why your production server failed. -
Implementing
log shipping is not technically difficult. Almost any DBA
with several months or more of SQL Server 7 experience can
successfully implement it.
Problems
with Log Shipping
Let’s face it, log
shipping is a compromise. It is not the ideal solution, but it
is often a practical solution given real-world budget
constraints. Some of the problems with log shipping include:
-
Log shipping
failover is not automatic. The DBA must still manually
failover the server, which means the DBA must be present
when the failover occurs. -
The users will
experience some downtime. How long depends on how well you implemented
log shipping, the nature of the production server failure,
your network, the standby server, and the application or
applications to be failed over. -
Some data can
be lost, although not always. How much data is lost depends
on how often you schedule log shipping and whether or not
the transaction log on the failed production server is
recoverable. -
The database
or databases that are being failed over to the standby
server cannot be used for anything else. But databases on
the standby server not being used for failover can still be
used normally. -
When it comes
time for the actual failover, you must do one of two things
to make your applications work: either rename the standby
server the same name as the failed production server (and
the IP address), or re-point your user’s applications to the
new standby server. In some cases, neither of these options
is practical.
Log
Shipping Overview
Before we get into
the details of how to implement log shipping, let’s take a look
at the big picture. Essentially, here’s what you need to do in
order to implement log shipping:
-
Ensure you
have the necessary hardware and software properly prepared to implement log
shipping. -
Synchronize
the SQL Server login IDs between the production and standby
servers. -
Create two
backup devices. One will be used for your database backups
and the other will be used for your transaction log backups. -
On the
production server, create a linked server to your standby
server. -
On the standby
servers, create two stored procedures. One stored procedure
will be used to restore the database. The other stored
procedure will be used to restore transaction logs. -
On the
production server, create two SQL Server jobs that will be
used to perform the database and transaction log backups.
Each job will include multiple steps with scripts that will
perform the backups, copy the files from the production
server to the standby server, and fire the remote stored
procedures used to restore the database and log files. -
Start and test
the log shipping process. -
Devise and
test the failover process. -
Monitor the
log shipping process.
Obviously I have
left out a lot of details, but at least now you know where we
are headed.
To make my
explanations easier to understand in this article, all my
examples assume you will be failing over only one database from
the production server to the standby server. In the real world
you will probably want to failover more than just one. Once you
have implemented log shipping for one database, it should be
obvious how to implement others. Generally, I just add
additional databases to my already existing scripts and jobs.
But if you prefer, you can create separate scripts and jobs for
each database you want to failover using log shipping.
As you read the
details of how I implement log shipping below, you may think of
other ways to accomplish the same steps. If so, then great. I am
sure there are many different ways to implement log shipping,
some of which are probably an improvement over mine. So feel free
to improve upon my methods.
Hardware
and Software Requirements
The hardware and
software requirements for log shipping are not difficult. The
hardware for the production and the standby server should be as
similar as you can afford. If your production server only
handles a couple of dozen simultaneous users, then you probably
don’t need to spend a small fortune on making the standby server
just like the production server.
On the other hand,
if your production server handles 500 simultaneous users, or has
multi-gigabyte database, then you may want to make your standby
server as similar to the production server as you can afford.
As far as software
is concerned, I just try to ensure than I have NT Server and SQL
Server at the same level of service packs. In addition, the two
servers must have SQL Server 7 configured similarly. For
example, the code page/character set, sort order, Unicode
collation, and the local all must be the same on both server.
In order to help
reduce any potential data loss during server failover from the
production server to the standby server, your production server
should have its transaction logs stored on a separate physical
drive array than the database files. While this will boost your
server’s performance, the main reason for this is to help reduce
data loss.
For example, if
the drive array with your database files on it goes down, then
hopefully the drive array with the log files will be OK. If this
is the case, then you should be able to recover the transaction
log and move it to the standby server, significantly reducing
any data loss. But if the transaction logs are on the same drive
array as the database files, and the drive array fails, then you
have lost any data entered into the system since the last log
file was shipped to the standby server.
Synchronize
SQL Server Login IDs
At this point, we
are going to get into the details of how to actually set up log
shipping. So get ready to be hit by lots of obscure details.
The first step
before you can begin log shipping is to ensure that the SQL
Server login IDs are synchronized between the production and
standby servers. This is important because SQL Server maintains
separate security among servers, and you will be making a backup
of a database on one server and restoring it to another. In
order for the database user IDs (found in each database) to work
on the standby server (where the database is restored), there
must be a matching SQL Server login ID on that server, otherwise
users will not be able to log into the database on the standby
server.
There are several
ways to do this:
-
Manually
synchronize SQL Server login IDs between the two servers.
While effective, rather boring. -
Script the
login IDs from the production server and then run the script
on the standby server to create the login IDs. You will have
to do this periodically as users are added and deleted.
While scripting works great for SQL Server login IDs that
use NT Authentication, it doesn’t work so well for login IDs
that use SQL Server Authentication. This is because if you
have login IDs using SQL Server Authentication, you will
have to know the user’s passwords in order to set them, or
figure out some way to get users to set the passwords
themselves. Login IDs that use NT Authentication are no
problem because passwords aren’t used. -
Backup the
Master database on the production server and restore it onto
the standby server. You will also have to periodically do
this as users are added and deleted. Or, consider using log
shipping on the Master database to keep SQL Server login IDs
synchronized between the two servers.
The option you
choose will depend on how the standby server is used. If the
standby server is purely dedicated as a failover server, then
setting up log shipping for the Master database is a good
solution.
But if you will be
using the standby server for other databases, such as for development databases, you won’t be able to using log shipping
on the Master database. Instead, you will have to use scripts,
or manually keep the two servers synchronized. As I have already
mentioned, if you have to do this, then you will want to use
only login IDs that use NT Authentication, not SQL Server
Authentication, because of the password’s issue.
Another problem
with login IDs using SQL Server Authentication is the fact that
when you restore a database to another SQL Server, you must
synchronize the login IDs on the server with the database user
IDs in the database. This is not a problem with user IDs that
user NT Authentication. To synchronize the logins IDs and the
database users IDs, you must run the sp_change_users_login
stored procedure. For more information on how to use this stored
procedure, click here.
If you want to
make log shipping easy, then don’t use the standby server for
anything other than failover, and always use NT Authentication
for your login IDs. While you don’t have to do either, your life
will just be a little more stress-free.
Once you have
figured out a way to synchronize the SQL Server login IDs, you
are ready to begin the next step.
Create
Your Backup Devices
This step is an
easy one. On the production server you will want to create two
backup devices. One will be used to store the database backup,
and the other one will be used to store the transaction log
backups for the database.
To keep things
simple, I name the database backup device after the name of the
database, something like, "database_name_backup_device",
and I name the transaction log backup device something like,
"database_name_log_backup_device". Sure these names
are a little wordy, but they are self-documenting. Choose
whatever names make the most sense for you.
Create
a Linked Server
Here’s a step that
may confuse some of you, especially if you have not used linked
servers before. A linked server allows a stored procedure on one
server to be called by a script or stored procedure on another
server, among other things.
What you need to
do is to create a linked server between your production server
and your standby server, so that a script running on the
production server can call a stored procedure on the standby
server.
To learn how to
create a linked server using a stored procedure, click
here. You can also create a linked server using Enterprise
Manager.
The reason you
need to create a linked server is because we will need to call
two different stored procedures on the standby server from the
production server. These two stored procedures are used to
restore either the database or the transaction logs
automatically (more information in the next section).
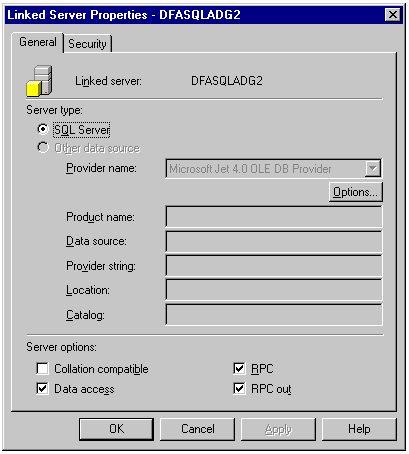
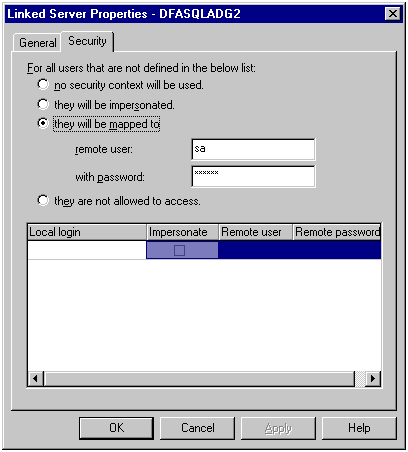
It is important
when you create the linked server that you assign the proper
level of security. Below are two screens showing how I have set
up my linked servers using Enterprise Manager.
Once you have
created your linked server, you are ready to create the stored
procedures on the standby server that will be called from the
production server.
Create
Stored Procedures to Restore Your Data
The next step is
to create two stored procedures on the standby server. One will
be used to automatically restore the database, and the other one
will be used to automatically restore the transaction logs.
You can give them
any names you like, but I have been using these two names for
obvious reasons:
-
restore_database_backups
-
restore_log_backups
Of course, you can
use any names you prefer.
You will need to
create these two stored procedures in a database that will never
be overwritten. If you are not using log shipping for the Master
database, then you can create them here. You can also create the
stored procedures in a database you created just for this
purpose. It doesn’t matter as long as you won’t be overwriting
them.
Stored
Procedure to Restore Database Backups
Here’s the script
I use for creating the "restore_database_backups"
stored procedure:
CREATE PROCEDURE
restore_database_backups AS
RESTORE DATABASE database_name
FROM DISK = ‘g:\mssql7\backup\database_name\database_name_backup_device.bak’
WITH
DBO_ONLY,
REPLACE,
STANDBY = ‘g:\mssql7\backup\database_name\undo_database_name.ldf’,
MOVE ‘logical_name’ TO ‘h:\mssql7\data\database_name.mdf’,
MOVE ‘logical_name’ TO ‘f:\mssql7\log\database_name_log.ldf’
WAITFOR DELAY ’00:00:05′
EXEC sp_dboption ‘database_name’, ‘single user’, true
Where "database_name"
refers to the name of the database being restored and where
"logical_name" refers to the logical name of the
database and log files, respectively.
Now let’s discuss
this script one line at a time.
The "CREATE
PROCEDURE" line should be self-explanatory for anyone who
has ever created a stored procedure.
The "RESTORE
DATABASE" line is the command to restore a database.
The "FROM
DISK" line is used to tell the "RESTORE DATABASE"
command where to find the database backup device. You will of
course have to specify a path that is appropriate for your
server, along with the appropriate backup device name.
The
"WITH" line is used to let us know there are some
options coming up.
The "DBO_ONLY"
option is optional and sets the database to "DBO USE
ONLY" after it is restored. I
have included it to help keep out people who should not be in
this database once it is restored.
The
"REPLACE" option tells the "RESTORE
DATABASE" command to replace any pre-existing database with
the same name. This is required to prevent errors when restoring
the database over an older version of the database.
The
"STANDBY" line tells the "RESTORE DATABASE"
command not to rollback any uncommitted transactions and to
allow read-only access to the database. This option requires you
to specify a file, such as, "undo_database_name.ldf"
to be used to "undo" any transactions. Locate this
file in an appropriate path.
The
"MOVE" lines tells the "RESTORE DATABASE"
command that the physical files that make up the database will
be in a different location on the standby server than they were
on the production server. You must specify the path to the
physical names of the database and log files on the standby
server.
The "WAITFOR"
line causes the script to pause for 5 seconds before it executes
the next line of code. I have added it here because I found that
if you don’t, that the previous "RESTORE DATABASE"
command may not be 100% complete before the following command
executes. If it isn’t, an error message occurs.
The
"EXEC" line is used to put the restored database in "SINGLE USER MODE". Each time you restore a
database, the "RESTORE DATABASE" command takes the
database out of "SINGLE USER MODE". If you don’t set
this now, when it comes time to restore again using this stored
procedure, you may get an error message if
there are any user connections to the database when the stored
procedure runs. While this
shouldn’t normally happen, I have seen it happen, and this line
of code prevents the stored procedure from failing.
Stored
Procedure to Restore Log Backups
Wow, that was a
lot, but here’s more. Here’s the script for creating the restore_log_backups
stored procedure. Notice
how similar it is to the restore_database_backups
stored procedure.
CREATE PROCEDURE restore_log_backups AS
RESTORE LOG database_name
FROM DISK = ‘g:\mssql7\backup\log\database_name\database_name_log_backup_device.bak’
WITH
DBO_ONLY,
STANDBY = ‘g:\mssql7\backup\log\database_name\undo_database_name.ldf’
WAITFOR DELAY ’00:00:05′
EXEC sp_dboption ‘database_name’, ‘single user’, true
Where "database_name"
refers to the name of the database being restored.
Now let’s discuss
this script one line at a time.
The "CREATE
PROCEDURE" line should be self-explanatory.
The "RESTORE
LOG" line is the command to restore a transaction log.
The "FROM
DISK" line is used to tell the "RESTORE LOG"
command where to find the transaction log backup device. You
will of course have to specify a path that is appropriate for
your server, along with the appropriate backup device name.
The
"WITH" line is used to let us know there are some
options coming up.
The "DBO_ONLY"
option is optional and sets the database to "DBO USE
ONLY" after the transaction log has been restored. I
have included it to help keep out people who should not be in
this database once it is restored.
The
"STANDBY" line tells the "RESTORE LOG"
command not to rollback any uncommitted transactions and to
allow read-only access to the database. This option requires you
to specify a file, such as, "undo_database_name.ldf"
to be used to "undo" any transactions. Locate this
file in an appropriate path.
The "WAITFOR"
line causes the script to pause for 5 seconds before it executes
the next line of code. I have added it here because I found that
if you don’t, that the previous "RESTORE LOG" command
may not be 100% complete before the following command executes.
If it doesn’t, an error message occurs.
The
"EXEC" line is used to put the restored database in
the "SINGLE USER MODE". Each time you restore a
transaction log, the "RESTORE LOG" command takes the
database out of "SINGLE USER MODE". If you don’t set
this now, when it comes time to restore again using this stored
procedure to restore a transaction log, you may get an error
message if there are any user connections to the database. While
this shouldn’t normally happen, I have seen it happen, and this
line of code prevents this stored procedure from failing.
Enough already. At
least this is enough of these two stored procedures. Unfortunately,
the detail gets worse before it gets better. Next, you will
learn how to create two SQL Server jobs that perform the database
and transaction log backups.
Create
the Backup Jobs
Now that we have
learned how to restore our databases and transaction logs, its
about time we learn how to back them up, move them from the
production server to the standby server, and then fire a remote
stored procedure on the standby server to perform the necessary
restore.
This is
accomplished using two multi-step SQL Server jobs. One job, as
you might expect, if for backing up the database, and the second
job is for backing up the transaction logs.
The Database
Backup Job
Let’s begin our
look at these jobs with the job used to backup the database on
the production server, move it to the standby server, and then
fire the stored procedure on the standby server to perform the
database restore. It
consists of the four steps outlined in this table:
| Step ID |
Step Name |
Step Type |
On Success |
On Failure |
| 1 | Truncate Log | T-SQL Script | Goto Next Step | Goto Next Step |
| 2 | Backup Database | T-SQL Script | Goto Next Step | Quit With Failure |
| 3 | Copy Backup | Operating System Command |
Goto Next Step | Quit With Failure |
| 4 | Restore Database | T-SQL Script | Quit With Success |
Quit With Failure |
Let’s first talk
about each step in general, then we will discuss each one in
depth.
Step 1 is to
truncate the transaction log. Why do we want to do this? The
reason for this is that when we perform the transaction log
backups (to be discussed in detail later), we won’t at that time
truncate the log. Instead, we will do it here. If we don’t do it
here, and we don’t truncate the log when we back up the log, then
it will grow forever.
The reason we don’t truncate the log when
we back it up is because we want to use the transaction log as a
secondary backup in case the backup on the standby server fails
and the database on the production server also fails. We will
talk more about this later. Even if this step of the job should
fail, we still want to backup the database. That’s why I specify
"Goto Next Step" if this step should fail.
Step 2 is to
backup the database onto its backup device. Note that if this
step in the job fails that we "Quit With Failure". No
point in copying a failed backup.
Step 3 is copy the
backup device from the production server to the standby server
using the XCOPY command.
Step 4 fires the
stored procedure on the standby server that is used to restore
the database on the standby server.
Now that we have a
look at the big picture, lets let at the script behind each of
these steps.
Step 1 Script
BACKUP LOG database_name WITH TRUNCATE_ONLY
WAITFOR DELAY ’00:00:05′
Where
database_name is the name of your database.
The "BACKUP
LOG" line is used to truncate the transaction log of the
database.
The "WAITFOR"
line is used to give the previous step time to complete before the
next step in the job executes.
Run this script
from the Master database.
Step 2 Script
BACKUP DATABASE database_name TO
database_name_backup_device WITH INIT
WAITFOR DELAY ’00:00:05′
Where
database_name is the name of your database, and
database_name_backup_device is the name of the backup device
used for the database backup.
The "BACKUP
DATABASE" does a full backup of the database to the named
backup device. The "WITH INIT" option is used to
delete any previous database backups from the backup device
before the backup is made.
The "WAITFOR"
line is used to give the previous step time to complete before the
next step in the job executes.
Run this script
from the Master database.
Step 3 Script
xcopy g:\mssql7\backup\backup_device_name.bak
\\standby_server_name\g$\mssql7\backup\ /c
For this operating
system command to work, the account used to run this job must
have local administrative rights on both the production and
standby servers. You will of course have to substitute your
paths and file names. The "g$" refers to the local
administrative share on the standby server where the backup
device is to be copied. The "/c" option tells the
command to continue copying even if an error of any kind occurs.
Step 4 Script
EXEC standby_server_name.master.dbo.restore_database_backups
This single line
is used to fire the restore_database_backups stored procedure on
the standby server. Note that I have used a fully qualified
object name for the stored procedure. You will want to do the
same.
Run this script
from the Master database.
Scheduling the
Database Backup Job
Once this
multi-step job is created, the next step is to schedule it. It
is important that this job only be scheduled to run once a day.
If it does not, it will get out of synch with the transaction
log backups, discussed in the next section. Select a time to run
it when it will produce the least affect on your users.
The Transaction
Log Backup Job
Now its time to
look at the second job, the job used to backup the transaction
log, move the log backup to the standby server, and then fire the
stored procedure used to restore the transaction log. It
consists of the three steps outlined in this table:
| Step ID |
Step Name |
Step Type |
On Success |
On Failure |
| 1 | Backup Log | T-SQL Script | Goto Next Step | Quit With Failure |
| 2 | Copy Log | Operating System Command |
Goto Next Step | Quit With Failure |
| 3 | Restore Log | T-SQL Script | Quit With Success |
Quit With Failure |
Let’s first talk
about each step in general, then we will discuss each one in
depth.
Step 1 is to back
up the transaction log onto its backup device. Note that if this
step fails that we "Quit With Failure". No
point in copying a failed backup.
Step 2 is copy the
backup device from the production server to the standby server
using the XCOPY command.
Step 3 fires the
stored procedure on the standby server that is used to restore
the transaction log on the standby server.
Now that we have a
look at the big picture, lets let at the script behind each of
these steps.
Step 1 Script
BACKUP LOG database_name TO
log_backup_device WITH INIT, NO_TRUNCATE
WAITFOR DELAY ’00:00:05′
Where
database_name is the name of your database, and log_backup_device is the name of the backup device
used for the log backup.
The "BACKUP
LOG" command does a transaction log backup of the database to the named
backup device. The "WITH INIT" option is used to
delete any previous database backups from the backup device
before the backup is made. The "NO_TRUNCATE" option is
used to tell the "BACKUP LOG" command not to truncate
the log, which is the default behavior of this command. We don’t
want to truncate the log each time we do a transaction log
backup because we might need it for some other reason later.
The "WAITFOR"
line is used to give the previous time to complete before the
next step in the job executes.
Run this script
from the Master database.
Step 2 Script
xcopy g:\mssql7\backup\backup_device_name.bak
\\standby_server_name\g$\mssql7\backup\ /c
For this operating
system command to work, the account used to run this job must
have local administrative rights on both the production and
standby servers. You will of course have to substitute your
paths and file names. The "g$" refers to the local
administrative share on the standby server where the backup
device is to be copied. The "/c" option tells the
command to continue copying even if an error of any kind occurs.
Step 3 Script
EXEC
standby_server_name.master.dbo.restore_log_backups
This single line
is used to fire the restore_log_backups stored procedure on
the standby server. Note that I have used a fully qualified
object name for the stored procedure. You will want to do the
same.
Run this script
from the Master database.
Scheduling the
Log Backup Job
Once this
multi-step job is created, the next step is to schedule it.
Scheduling this job is more complicated that scheduling the
database backup job. There are two key decisions you will have
to make. First, you must decide how often you want to do a log
backup. Generally, the more often, the better, as less data is
subject to loss. I generally perform a log backup every 15
minutes. Another way of saying this is that I am doing log
shipping every 15 minutes.
The second aspect
of scheduling is to prevent your scheduled log backups from
interfering with your database backups. If they get out of sync
with each other, the transaction log restores will fail, and you won’t
have a current backup of your database on your standby server.
To prevent any potential conflict, what I do is schedule the log
backup job to stop 15 minutes before the database backup begins, and then to restart 15 minutes after the database backup
is run. This way, there should be no scheduling conflicts.
Test,
Test, and Test Some More
We are almost
done. While all the steps are now in place, the last step is to
test everything over a period of several days to be sure the
jobs and stored procedures work properly. Since each job keeps its own success and
failure history, it is not to hard to debug any job-related problems you run
across.
Before you add log
shipping to your production server, I suggest you set it up and
test it first on two non-production SQL Servers if you can. This
will prevent any of your learning mistakes to bring down your
production server.
Don’t think that a
successful log shipping solution eliminates the need for storing
backups to tape. Besides everything I have described in this
article, I still back up all of my database and log disk backups
to tape on a daily basis. There is no such thing as having too
many backups.
Monitor
Everything
Once you have your
log shipping process in place, be sure to monitor it for
success. Be sure to set up job notifications so that you are
notified by e-mail or pager if either of your two log shipping
jobs fail.
How
to Failover to the Standby Server
Once log shipping
is successfully implemented, you will want to create your own
scripts to implement an actual failover to the standby server,
and then you will want to test your process to see that it works
successfully.
Since I am not familiar
with your specific environment, I cannot provide you an exact
set of steps to follow when failing over your production server
to your standby server, but what I can do is list some of the
most common things you will need to consider. They include:
-
Are you able
to recover the transaction log on the production server? If
so, then you may want to run a script similar to this one in
order to back it up:
BACKUP LOG database_name TO database_name_log_backup_device WITH INIT, NO_TRUNCATE
-
If you have
recovered the transaction log on the production server, you
may want to restore in on the standby server using a script
similar to this one:
RESTORE LOG database_name
FROM DISK = ‘d:\sql7\log\database_name_log_backup_device.bak’
WITH
DBO_ONLY,
STANDBY = ‘d:\sql7\undo_database_name_log.ldf’
-
Whether or not
you were able to recover the transaction log or not from the
production server, you will need to run a script similar to
the one below in order to "recover" the standby
server and turn it into your production server.
RESTORE DATABASE database_name WITH RECOVERY
EXEC SP_DBOPTION ‘database_name’, ‘read only’, ‘false’
EXEC SP_DBOPTION ‘database_name’, ‘dbo use only’, ‘false’
-
Once your
standby server has been failed over, the next step is to
re-point your clients to it. How you do this will depend on
your clients. As a last resort, you can always rename your
standby server to the name of your production server, and
change the IP address, but this solution often creates
problems of its own. You will just have to test to find the
best way to re-point your clients to your SQL Server. For
more information on how to rename a SQL Server, see this FAQ
from Microsoft:
http://msdn.microsoft.com/library/psdk/sql/faq.htm
-
Another aspect
of the failover process you will want to plan for is how you
will make the move back from the standby server to the
production server once the production server is working
again.
As you can see,
setting up log shipping involves a lot of detailed steps. If you
want to give it a try, try to allocate the largest part of a
couple of days to implement and test it. But once it is going, I
thing you will find it a great time saver when your production
server goes down.
I hoped you
found this article informative. If you have specific questions,
or would like to offer suggestions on how I can improve this
procedure, please write.
I will incorporate any suggestions into the body of this
article. This article was last updated on 7-7-2000.