


Learn how to consume and make use of the ADO.NET Data Service in a .NET Framework Client Application. This article demonstrates the process by creating a simple web application that uses an existing ADO.NET Data Service.
Introduction
In
this article, we will be looking at how to consume and make use of the ADO.NET
Data Service in a .net framework client application. I will demonstrate the
process by creating a simple web application, which will use an existing
ADO.NET Data Service. This demo application will involve the basic CRUD
operations onto the data source. CRUD stands for Create Read Update and Delete.
If
you want to know what an ADO.NET data service is or how to create one, then I
would recommend you to go through my previous article “ADO.NET
Data Services in the .NET Framework”.
Consuming ADO.NET Data Service
The
ADO.NET data service is a specialized WCF service, which is a .svc file. Once
the data service is hosted, then any .net framework application can consume it;
it could be a console, windows or web application. The first step in consuming
the ADO.NET data service is to add a service reference. To add a service
reference follow the steps below.
1.
Right click on the client project and select Add a Service Reference.
2.
In the Add Service Reference dialog box, provide the URL of the hosted
ADO.NET Data Service and click on Go button. This will discover the ADO.NET
Data Service. Fig 1.0 shows the sample screenshot.

Fig 1.0
3.
Click on the OK button to create a service reference proxy on the client
application project. Note that it would have created a type BarDatabaseEntities
deriving from the .net framework base class DataServiceContext. This class will
be used to perform the CRUD operations.
BarDataService – ADO.NET Data Service
I
have created a website containing an ADO.NET Data Service called
BarDataService.svc. The data source will be a simple .mdf SQL database
containing a single table called Consumers. I have populated a few records in
the Consumers table. The data model representation to the Data Service is
provided through an ADO.NET Entity Data Model. Fig 2.0 shows the screen shot of
the data model displayed on the .edmx file.
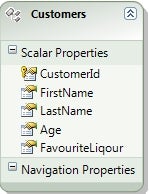
Fig 2.0
I
have skipped the creation of ADO.Net Data Service in this article since this
article will deal only with the client application development and working with
the Data Service in it.
CRUD operations
Add
a new Asp.Net Web Application project to the solution and add the service
reference to the BarDataService. This will create the service reference proxy
in the client web application.
The
basic operations that we are going to perform in this web application is
displaying the list of Customers, creating a new customer, updating an existing
customer and deleting a customer using the BarDataService.
Create
web page called Default.aspx. Below is the .aspx designer code.
<%@ Page Language="C#" AutoEventWireup="true" CodeBehind="Default.aspx.cs" EnableEventValidation="false" Inherits="BarWebApp._Default" %>

<%@ Register assembly="System.Web.Entity, Version=3.5.0.0, Culture=neutral, PublicKeyToken=b77a5c561934e089" namespace="System.Web.UI.WebControls" tagprefix="asp" %>

<!DOCTYPE html PUBLIC "-//W3C//DTD XHTML 1.0 Transitional//EN" "http://www.w3.org/TR/xhtml1/DTD/xhtml1-transitional.dtd">
<html >
<head runat="server">
    <title>Bar Website</title>
    <style type="text/css">
        .style1
        {
            width: 116px;
        }
    </style>
</head>
<body>
    <form id="form1" runat="server">
    <div>
        <h2>
            Customer Registration</h2>
    </div>
    <div>
        <table style="height: 187px; width: 398px">
            <tr>
                <td class="style1">
                    First Name:
                </td>
                <td>
                    <asp:TextBox ID="FirstNameTextBox" runat="server" Width="192px"></asp:TextBox>
                </td>
                <tr>
                    <td class="style1">
                        Last Name:
                    </td>
                    <td>
                        <asp:TextBox ID="LastNameTextBox" runat="server" Width="192px"></asp:TextBox>
                    </td>
                </tr>
                <tr>
                    <td class="style1">
                        Age:
                    </td>
                    <td>
                        <asp:TextBox ID="AgeTextBox" runat="server" Width="43px"></asp:TextBox>
                    </td>
                </tr>
                <tr>
                    <td class="style1">
                        Favourite Liquor:
                    </td>
                    <td>
                        <asp:TextBox ID="LiquorTextBox" runat="server" Width="192px"></asp:TextBox>
                    </td>
                </tr>
                <tr>
                    <td class="style1">
                    </td>
                    <td>
                        <asp:Button ID="RegisterButton" runat="server" Text="Register"
                            onclick="RegisterButton_Click" />
                    </td>
                </tr>
        </table>
    </div>
    <br />
    <div>
        <h2>
            Customer List
        </h2>
    </div>
    <asp:GridView ID="CustomerListGridView" runat="server"
        AutoGenerateColumns="False" CellPadding="4" ForeColor="#333333"
        GridLines="None" Width="455px"
        onrowdeleting="CustomerListGridView_RowDeleting"
        onrowediting="CustomerListGridView_RowEditing"
        onrowupdating="CustomerListGridView_RowUpdating"
        onrowcancelingedit="CustomerListGridView_RowCancelingEdit">
        <RowStyle BackColor="#EFF3FB" />
        <Columns>
            <asp:BoundField DataField="CustomerId" HeaderText="Customer ID" />
            <asp:BoundField DataField="FirstName" HeaderText="First Name" />
            <asp:BoundField DataField="LastName" HeaderText="Last Name" />
            <asp:BoundField DataField="Age" HeaderText="Age" />
            <asp:BoundField DataField="FavouriteLiqour" HeaderText="Liquor" />
            <asp:CommandField ShowEditButton="True"/>
            <asp:CommandField ShowDeleteButton="True" />
        </Columns>
        <FooterStyle BackColor="#507CD1" Font-Bold="True" ForeColor="White" />
        <PagerStyle BackColor="#2461BF" ForeColor="White" HorizontalAlign="Center" />
        <SelectedRowStyle BackColor="#D1DDF1" Font-Bold="True" ForeColor="#333333" />
        <HeaderStyle BackColor="#507CD1" Font-Bold="True" ForeColor="White" />
        <EditRowStyle BackColor="#2461BF" />
        <AlternatingRowStyle BackColor="White" />
    </asp:GridView>
    <div>
    </div>
    </form>
</body>
</html>
Below is the C# code of the code behind file Default.aspx.cs.
public partial class _Default : System.Web.UI.Page
{
    BarDatabaseEntities _entities = null;
    private const string SERVICE_URI = "http://localhost:59290/ADONETDataService/BarDataService.svc/";

    protected void Page_Load(object sender, EventArgs e)
    {
        //Bind data only on fresh load
        if (!Page.IsPostBack)
            BindCustomerData();
    }

    private void BindCustomerData()
    {
        //Query the data and bind it to the gridview
        _entities = new BarDatabaseEntities(new Uri(SERVICE_URI));
        //construct the URL and execute it. Note the query string options provided.
        var customers = _entities.Execute<Customers>(new Uri("Customers?$orderby=CustomerId", UriKind.Relative));
        CustomerListGridView.DataSource = customers.AsEnumerable();
        CustomerListGridView.DataBind();
    }

    protected void CustomerListGridView_RowUpdating(object sender, GridViewUpdateEventArgs e)
    {
        GridViewRow row = ((GridView)sender).Rows[e.RowIndex];
        int customerId = Convert.ToInt32(((TextBox)row.Cells[0].Controls[0]).Text);
        _entities = new BarDatabaseEntities(new Uri(SERVICE_URI));

        var customer = (from c in _entities.Customers
                        where c.CustomerId == customerId
                        select c).First();
        customer.FirstName = ((TextBox)row.Cells[1].Controls[0]).Text;
        customer.LastName = ((TextBox)row.Cells[2].Controls[0]).Text;
        customer.Age = Convert.ToInt32(((TextBox)row.Cells[3].Controls[0]).Text);
        customer.FavouriteLiqour = ((TextBox)row.Cells[4].Controls[0]).Text;

        //Updates the customer object
        _entities.UpdateObject(customer);
        //Saves the changes to the database
        _entities.SaveChanges();

        CustomerListGridView.EditIndex = -1;
        BindCustomerData();
    }

    protected void CustomerListGridView_RowEditing(object sender, GridViewEditEventArgs e)
    {
        CustomerListGridView.EditIndex = e.NewEditIndex;
        BindCustomerData();
    }

    protected void CustomerListGridView_RowDeleting(object sender, GridViewDeleteEventArgs e)
    {
        GridViewRow row = ((GridView)sender).Rows[e.RowIndex];
        int customerId = Convert.ToInt32(row.Cells[0].Text);
        _entities = new BarDatabaseEntities(new Uri(SERVICE_URI));

        var customer = (from c in _entities.Customers
                        where c.CustomerId == customerId
                        select c).First();

        //Delete the customer object
        _entities.DeleteObject(customer);
        //Save the changes to the database
        _entities.SaveChanges();

        BindCustomerData();
    }

    protected void CustomerListGridView_RowCancelingEdit(object sender, GridViewCancelEditEventArgs e)
    {
        CustomerListGridView.EditIndex = -1;
        BindCustomerData();
    }

    protected void RegisterButton_Click(object sender, EventArgs e)
    {
        _entities = new BarDatabaseEntities(new Uri(SERVICE_URI));
        //Create a customer entity
        Customers customer = new Customers();
        customer.FirstName = FirstNameTextBox.Text;
        customer.LastName = LastNameTextBox.Text;
        customer.Age = Convert.ToInt32(AgeTextBox.Text);
        customer.FavouriteLiqour = LiquorTextBox.Text;
        //Add the customer object
        _entities.AddToCustomers(customer);
        //Save the changes to the database
        _entities.SaveChanges();
    }
}
In
the above code I have in-lined my comments. Also notice once any Add, Update or
Delete of the customer object is carried out, the SaveChanges() method is
called. This is the method that is responsible for saving the data back to the
database through the ADO.NET data service.
Let’s
run the application now. Enter the values in the fields First Name, Last Name,
Age and Liquor and click on register. Notice that the record is added to the
database and displayed in the GridView as shown in Fig 3.0 and Fig 3.1
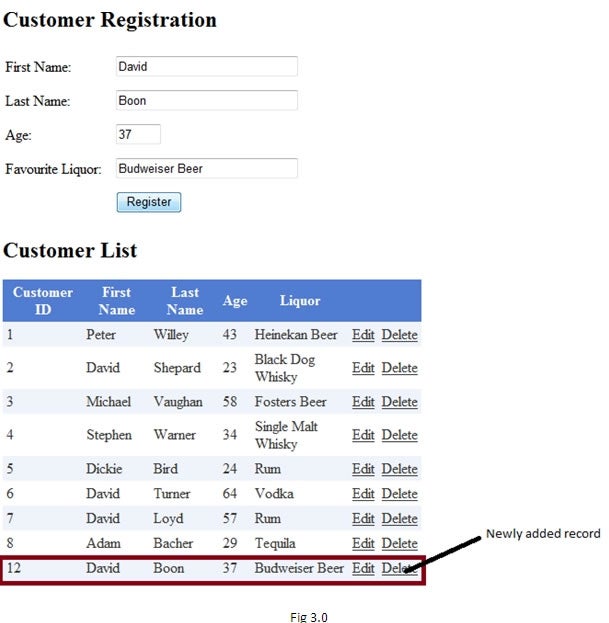
Fig 3.0
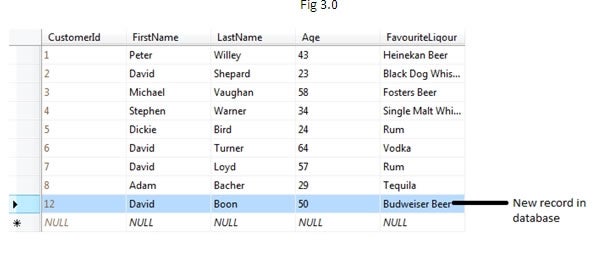
Fig 3.1
Now
go ahead an update a record in the GridView. For example, update the customer
David Boon’s age to 50 and click on update. You will notice the age being
updated in the database, likewise the delete also works cool.
Conclusion
I hope
this article covers the Create Update Delete and Read operations using the
ADO.NET Data Service in a .net framework client application. I have attached
the source code of the developed
application along with this article.