


HeidiSQL is a free and easy-to-use GUI client for MySQL. It’s favored by many Web developers and database administrators of small to medium-sized businesses to manage persistent storage of data. Version 4.0 of “the program with the odd name” was released just a few days ago on April 30th, 2009. After over a year-and-a-half since the last major release, several new features have been introduced, including:
- a completely rewritten user manager
- new grid and popup editors for text, blobs, date/time, set, and enum
- a new editor for views
- a new editor for creating stored procedures and functions
In this article, we’re going to familiarize ourselves with HeidiSQL’s Query editor by using it to write a query. Our query will join four tables together to perform searches against a help library.
Why Use an SQL Editor?
The SQL editor is ideal for testing queries for embedding in a Web language like PHP; it’s good practice to create and test your queries directly against the database before running them from within an application. The advantage of using a GUI tool like HeidiSQL over a command line interface is that the former offers perks such as customizable syntax-highlighting, code-completion, and error reporting. More importantly, it shields you from having to concern yourself with the command prompts. The result: very little command-line knowledge is required!
Create the Help Database
If you haven’t already done so, visit the HeidiSQL website, download version 4 and install it, following their instructions.
Launch HeidiSQL to display the Session Manager:
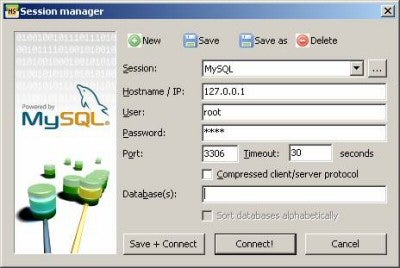
For our purposes, you can use the default MySQL session and user account, just to keep things simple. Hit the Connect! button to open the main application window.
I’ve created a small database to work with. Download it here.
Here’s how to import the “help” database:
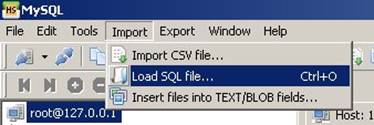
From the Import menu, click the “Load SQL File…” item and select the Help.sql file in the “Open” dialog:
That will open the file in the Query editor window. Click the blue arrow button in the toolbar to execute the query:
![]()
It will take a minute or two for the database to be added and for the tables to be populated with data.
Once the import process has completed, you may have to refresh the database tree pane on the left-hand side to see it by right-clicking it and selecting “Refresh” from the popup menu. Alternatively, you can just hit the F5 key.
If you expand the help database, you’ll see that it contains four tables. It is these that our query will be reading from:
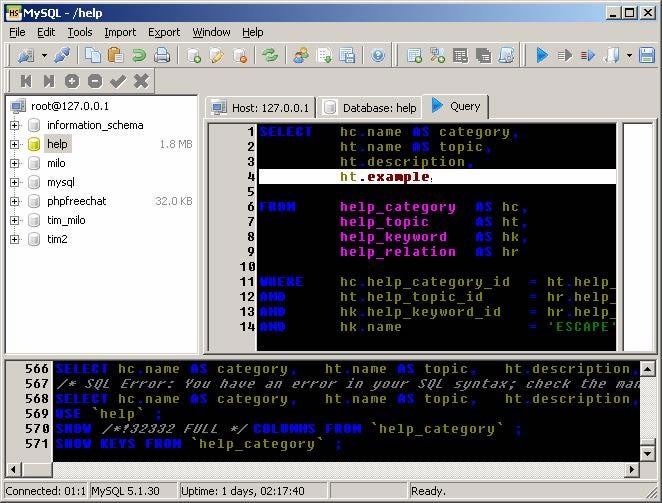
The Query Editor
The Query Editor is located on the Query Tab:

Pictured above is what our query would look like with the default preferences. Syntax-highlighting helps to distinguish query elements such as variables, table names, and SQL reserved words, while the line numbering helps pinpoint errors. The fonts and colors can be customized from the SQL tab on the Preferences dialog. It’s the last item in the Tools menu:
The SQL Preferences Tab
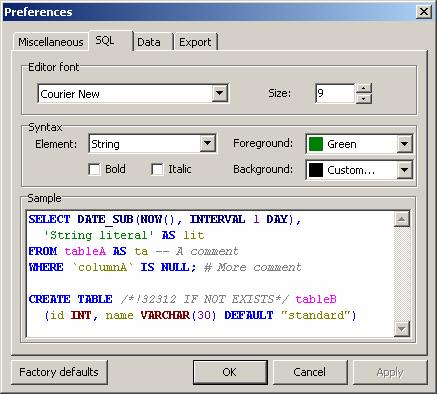
To change the Foreground and Background colors for a specific element, select it from the Element dropdown list and select the associated colors. The changes will become visible in the Sample window so that you can compare them to the previous colors. When you’re satisfied with the settings click OK to close the dialog:
Query Editor with Custom Settings
Writing the Query
I like to start my queries by assigning aliases to the tables. Using table aliases is a simple way to increase both the readability and performance of your code. To alias a table, follow it with the words “AS [alias name]”:
FROM	help_category	AS hc,
		help_topic	AS ht,
		help_keyword	AS hk,
		help_relation	AS hr
Now, as you write the “SELECT” portion of the query, you can enter the short alias names to bring up an auto-completion list:
The Auto-completion List in HeidiSQL
Here’s the code for the SELECT portion of the query:
SELECT 	hc.name AS category,
		ht.name AS topic,
		ht.description,
		ht.example
A list containing the table fields will appear whenever you enter the period after a table alias. To select an item from the popup list, either click it with the mouse or use the UP and DOWN arrow keys to navigate to the desired item and press the ENTER key to select it. Notice that columns can also be aliased using the same syntax. This is necessary when a duplicated column name in our select statement refers to multiple tables. Before pointing the finger at the database administrator, you should realize that repeating field names is actually a desirable side effect of using consistent naming conventions.
Perhaps the greatest benefit of using the same name across tables is that it makes it easier to join them. It’s very important to join queried tables using common fields; failing to do so will cause the query to fetch all the rows from every table in the query, whether or not they have associated rows in other tables! When entering the WHERE clause, be careful not to leave out the closing semi-colon:
WHERE		hc.help_category_id 	= ht.help_category_id
AND		ht.help_topic_id	= hr.help_topic_id
AND		hk.help_keyword_id	= hr.help_keyword_id;
To try out the query, click the Execute SQL button, as you did to create the “help” database:
![]()
The two smaller arrows to the right of the Execute SQL button come into play when you have more than one SQL statement in the editor. The first button (greyed out in the image above) is only enabled when you select some SQL code, as it executes the selected text. The next arrow button executes the line that the cursor is on.
The results should then appear in the pane directly below the Query editor. In the event of an error, a message box will appear such as the following:

Unfortunately, error messages are often less detailed than they could be. Hopefully they will improve in future releases.
Fine Tuning the Query
Usually, queries are utilized to seek data that fulfils some specific criteria. The process of narrowing the dataset down is known as filtering. A useful tool to filter data is the Like operator, which works much like the Find utility in Windows. The underscore (_) character matches one character and the percentage (%) character matches zero or more characters. Adding the following line to the end of the WHERE clause will filter the results to only those records which contain the letters ‘JOIN’ anywhere in the name field of the help_keyword table:
AND hk.name Like '%JOIN%';
Saving your Query
HeidiSQL allows for saving of the results as well as the SQL code. Under the Export menu, there are several entries for copying the results grid to various formats and for saving them to a file. The last item, “Export grid data as CSV, HTML, XML, or SQL …”, is used for saving.
There are two ways to save SQL code. The first is to save it to an SQL text file. The second is to save it as a snippet. A snippet is a reusable code block. Hence, any code that you tend to repeat a lot is a good candidate for a snippet:
The Save and Save as Snippet Buttons
![]()
Using a GUI utility like HeidiSQL 4’s Query editor is an easy way to write SQL code with little familiarity with MySQL’s commands. Thus, it is very well suited for Web developers who need to interface with a MySQL database. In the weeks to come, we’ll be continuing our overview of HeidiSQL 4 with a look at stored routines, including procedures and functions.