In a previous series of articles, I showed you the integration features between the IBM DB2 Universal Database for Linux, UNIX, and Windows Version 8.x (DB2 UDB) product and the Microsoft Visual Studio.NET 2003 integrated development environment (IDE).
In early June 2006, IBM announced the next release of the DB2 product, DB2 9. Part of this announcement included the support for Microsoft Visual Studio 2005 and its accompanying ADO.NET 2.0 driver.
As you may recall, Microsoft announced the Visual Studio 2005 product, along with SQL Server 2005, in late 2005. Around the same time, IBM delivered a beta of the now officially announced DB2 integration into Microsoft Visual Studio 2005 and ADO.NET 2.0.
The product level of this code became generally available when DB2 9 made its debut in August 2006, and you can download it at: https://www14.software.ibm.com/webapp/iwm/web/preLogin.do?source=dbaddvs&S_TACT=105AGX11&S_CMP=TILE=.
For this article, I recommend that you download the free DB2 Express-C product, which includes the pureXML feature, so you can follow the steps outlined in this article. You can download your own free no-database-size-limit copy of DB2 9 (which also includes 64-bit support) at: http://www-306.ibm.com/software/data/db2/express/download.html .
As I’ve been writing about the DB2 integration into Visual Studio 2005, I’ve discussed the following topics in other articles:
Binding DB2 Data to Visual Studio 2005 Windows Applications
How to quickly build a Windows Application that binds various controls (ComboBoxes, DataGrids) using the new Visual Studio 2005 support announced for DB2 9.
How to Build an ASP.NET Web Site Using DB2 Data with Visual Studio 2005
How to build an ASP.NET Web site that is backed by a DB2 data store.
Build a DB2 Bound Data Application using Visual Studio 2005
An alternative method where you can even more quickly build a Windows Application using a data grid that binds to your DB2 data source. This approach is a little different from the first article in this list in that you don’t specifically bind controls to an application: it’s even easier than that.
Building Tables with the DB2 Designer and Visual Studio 2005
How to use the unique DB2 designers to create database schema objects. I specifically cover creating a table using these designers. You can read this article at: https://www.databasejournal.com/features/db2/article.php/3628056.
In this article, I want to show you how you can leverage the Visual Studio 2005 XML tools to create an XML Schema Definition (XSD) document for subsequent registration into the DB2 9 XML Schema Repository (XSR) that’s part of the DB2 pureXML feature.
The steps in this article will show you how to create an XSD document that defines a complex data type (called CanadianAddress), which can be used in an XML document. Another XSD document will be created that includes the CanadianAddress XSD and optionally used to subsequently validate XML data in your DB2 9 database. Subsequent articles will build on this XSD and use it to perform various tasks like validation on insert, shredding, and so on – all from the Visual Studio IDE!
Creating an XSD in Visual Studio 2005
Visual Studio 2005 comes with a rich set of XML features so it’s great to know that the productivity delivered by these tools can be leveraged with DB2 9.
You can create data types for your XML document from within an XSD and have that data validated by DB2 9 as well.
To create an XML data type within an XSD, perform the following steps:
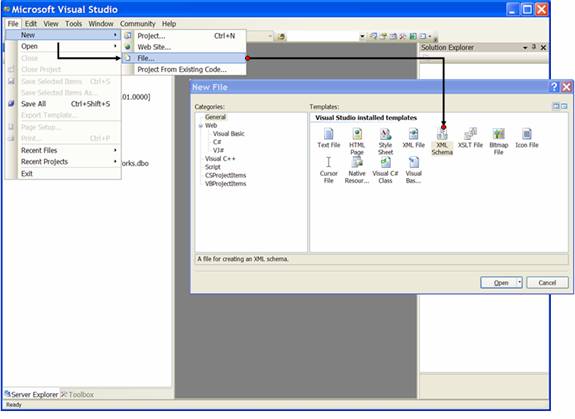
1. Open a new file for editing by clicking New>File, and select XML Schema from the General tab:
2. The XML Schema editor opens. Right-click in the middle of the designer pane, and select Add>New complexType:
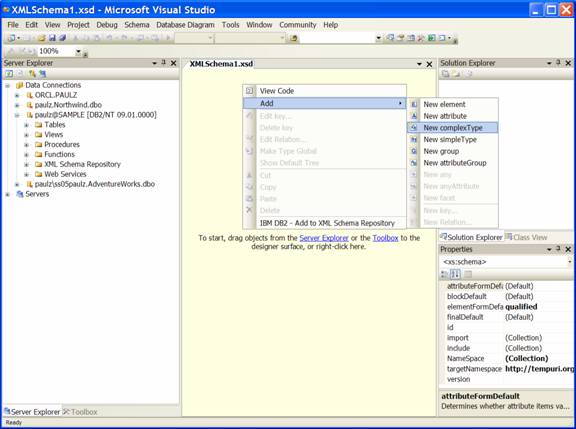
Notice the IBM DB2 – Add to XML Schema Repository option from the pop-up menu? This feature gives you the ability to quickly and easily register an XSD in the DB2 9 XSR – more on that in a future article in this series.
3. The XSD editor opens. Create a complex data type that will be used for Canadian-based addresses in your XML documents by performing the following steps:
a. Change the name of the data type to CanadianAddress so that when you hover over the XSD editor it looks like this:
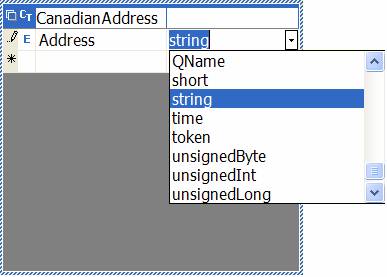
b. Click-in the first empty cell, denoted with an asterisk (), and create an element called Address. (An
appears beside the element name to identify it as an element.) Assign a String data type to it by clicking the drop-down arrow in the corresponding field and selecting string:
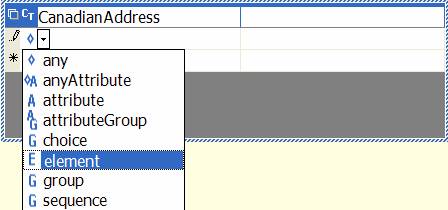
Note: The default action when you enter new rows in the XSD editor is to define those rows as elements. To define this manually, click the drop-down arrow in the box below the CT (for Complex Type) field in the XSD header, and select element from the drop-down list:
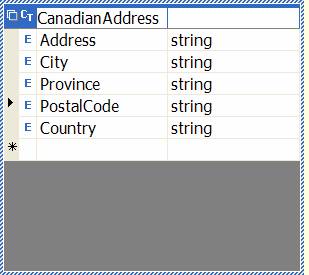
c. Add the following elements to the complex CanadianAddress data type:
- City
- Province
- Postal Code
- Country
The XSD editor should now look like this:
When you are working with the XSD editor:
- The asterisk (
) indicates that it is a new row.
- The pencil (
) indicates that you are editing a current row.
- The pointer (
) indicates the row that you currently have focus on for editing.
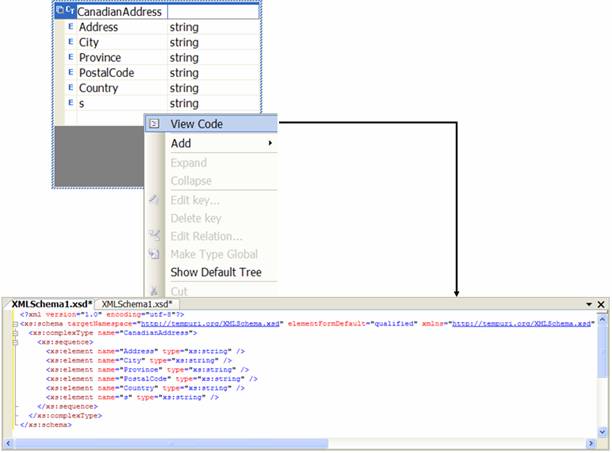
You can see the XSD-compliant XML code that is generated ‘behind-the-scenes’ by right-clicking the XSD editor and selecting View Code:
4. If you look at the top of the XSD editors, you will notice asterisks appended to the name of each tab. This indicates that these pages contain unsaved changes:
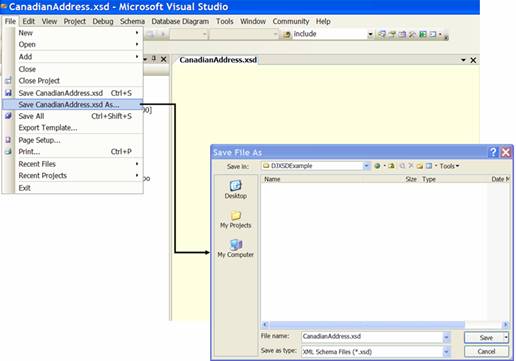
Save your changes as CanadianAddress.xsd and then close the editor (by clicking ), as shown below:


