
Connected Database Object Options from the Database Explorer View
In this new series, we are exploring the integrated
development environment (IDE) of IBM Data Studio (formerly known as IBM Data
Server Developer Workbench during the open beta), which is new with DB2 9.5
(formerly known as DB2 Viper 2). In Part 1
of this series, we looked at how to add a database connection to the Database
Explorer view. In this article, we’ll start to delve into some of the enhanced and
new features from this view in DB2 9.5: specifically, the options available to
you from a live database connection object.
Note: In Part 1, I
referred to this toolset by its name as of the DB2 Viper 2 Beta 2 version. As
you’ll see, this has now changed as DB2 Viper 2 has been officially named DB2
9.5, and the IDE has been officially dubbed IBM Data Studio. In Beta 1, it was
referred to as Viper Studio. In this article, I’ll start using the newly
announced names for both DB2 and the IDE, however if you’re referring to past
articles in this series, you can interchange the names (they all represent the
same thing).
Assumptions if you’re starting here…
I recommend that you start with Part 1 because I build on
the concepts introduced and the objects created there. For example, in this
part, I’ll leverage the database connection to the DB2 9 SAMPLE database from Part
1 and that database was created with both relational and XML data. Since IBM
Data Studio automatically detects local database connections and adds them to
the Database Explorer view, you can start here in Part 2 if you want so long as
you’ve run the db2sampl –xml –sql command from your operating system’s
command prompt. To get a copy of the latest DB2 9 .5 beta, visit: www-306.ibm.com/software/data/db2/9/download.html.
(Be sure to bookmark the following URL to download copies of DB2 Information
Management software as it becomes generally available: http://www.ibm.com/software/data/db2/9/download.html.)
Database options in IBM Data Studio Database Explorer view
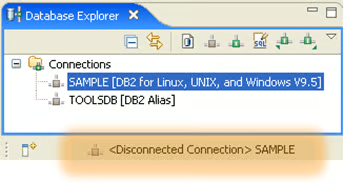
After working through Part 1 in this series, the Database
Explorer view should look similar to the following figure:
Connecting to a database
Before you can work with a database from the Database
Explorer view, you need to initiate a connection to the database (which assumes
the DB2 instance where the database resides has been started). In the previous
figure, you can see that IBM Data Studio shows you the connection status of a
selected database from the Database Explorer view. (See the highlight in the
previous figure.) In addition, icons beside the database names serve as quick
connection status identifiers. For example, since I don’t have an active database
connection in the previous figure, the connection icon beside the SAMPLE database
is gray (![]() ) instead of green .
) instead of green .
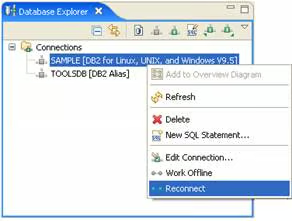
To connect to a selected database, perform the following
steps:
1. Select
the database that you want to connect to. (For this example, select the SAMPLE
database.)
2. Right-click
the selected database and select the Reconnect option. The Database
Authorization dialog box opens.
3. Enter
a user account that has the correct authorization for this database, and click OK:
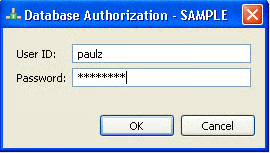
If the connection is successful,
the icon beside the corresponding database turns green (![]() ),
),
and the status message referred to earlier indicates a live database connection.
You can also see details about your database connection in
the Properties view:
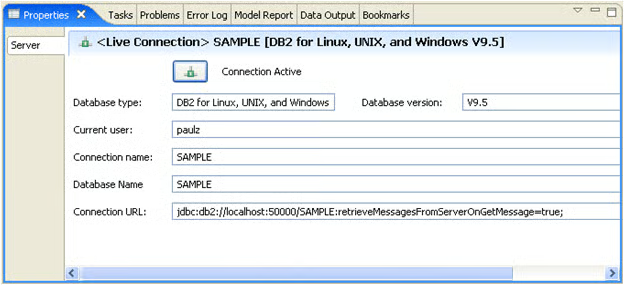
Make note of this tab because it contains valuable
information that can be very useful for your day-to-day work. Specifically, I
find being able to copy and paste the Connection URL field beneficial
when working with certain applications, or when building my own.
If the connection fails (such as when the instance is
stopped or incorrect credentials were provided) IBM Data Studio displays a message:
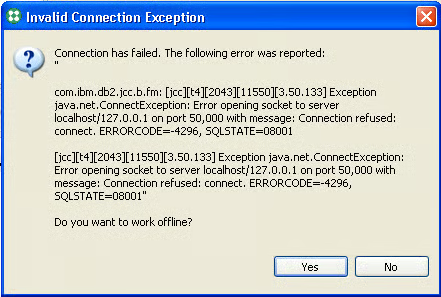
The previous message is what I got when I stopped the
instance and tried to connect to the SAMPLE database. Granted, this message might
not tell you what you want to know, but it might change after beta code. You
will notice at the bottom the choice to work in offline mode. I’ll
discuss this very valuable concept later in this article since you can
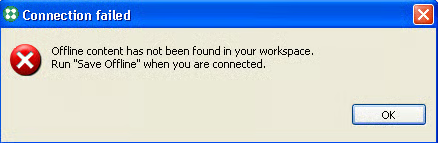
enable this option. If offline operation is not enabled and you click Yes in
the previous window, you receive a message indicating this status, as shown
below:
Once you have a database connection, you can perform a
number of operations at the database level, as shown by the pop-up context menu
(which you get by right-clicking a connected database):
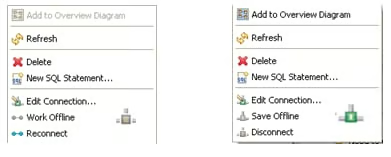
The available options for a connected database are the focus
for the remainder of this article.