


Ok, this truly is a ‘basics’ article. I’ve never been fond of the TreeView & ListView because the library file that exposes these controls, MSComCtl.ocx, always seemed to behave a little quirky. It was as if I could never be sure which version of the controls any given user would have on their computer and while the controls worked fine for me, users constantly experienced issues. So, I gave up on them … but maybe too soon.
Recently I’ve been working with the TreeView & ListView controls on some utilities we use in-house, and the problems I remember from my Access 97 days have not manifest themselves. I’m sure I’ll get email from developers who never encountered problems with these controls in Access 97 applications, but alas, that was my experience. But all that’s water under the bridge, and I am finally, after all these years, embracing this family of controls.
However, as a newcomer to the TreeView & ListView control, I have no depth of wisdom to impart. There are resources a plenty on the web that describe advanced techniques. This article will focus on getting started. Click here to download the sample code.
Reference The Control
The first step is critical. You need to inform your Access application that you plan to use these controls, and point it to the Microsoft Library wherein they are contained. On all the Access installs where I develop, that ends up being in the Windows\System32 directory:
C:\Windows\System32\MSComCtl.ocx To add the reference, you need to open any VBA code module (the keystroke Ctl+G will get you there), and select References from the Tools menu. With most libraries, you simply need to scan the list for the one you want. You’re looking for the Microsoft Windows Common Controls library, but if your install is like mine, you won’t find it in the list. You’re going to have to browse to it, thus the need for the path given above. The process is illustrated in the screen shot below. Find the file, click Open and then click OK on the References dialog, and we’re ready to code.

Build the Form
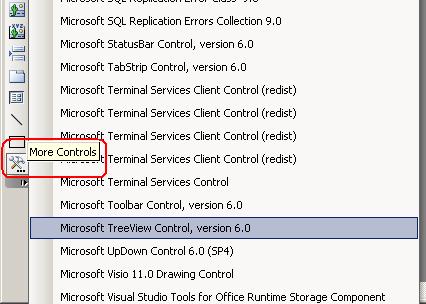
The first step, and not a trivial one, is to get the control(s) on your form. There are two ways to do this. You can click on the “More Controls” button on the ToolBox toolbar, which will pop up a scrollable list of available ActiveX controls. Scan the list for Microsoft TreeView Control or Microsoft ListView Control and select it.
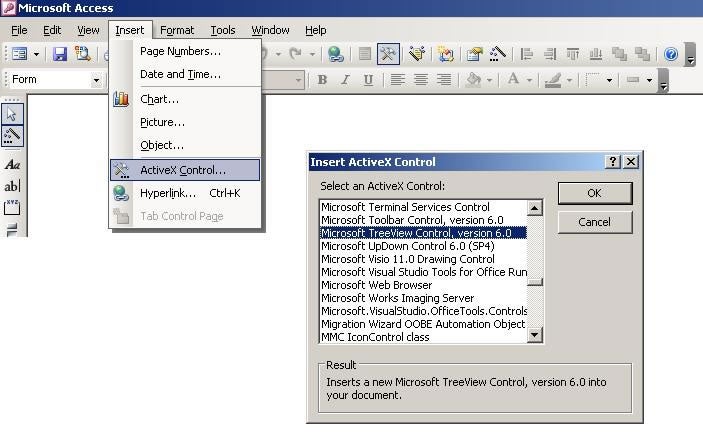
Alternatively, you can choose ActiveX Control from the Insert menu and work with a smaller, more manageable pick list which gives you feedback about the control you are about to plunk on your form. Either way, you end up with a special object that has, as we shall see, special properties.
This new control (TreeView shown in the screen shot) exposes a special properties dialog box, in addition to the standard properties that Access exposes for all controls, such as Height & Width, Top & Left, etc. To expose these special properties, right-click the control and choose TreeCtl Object >> Properties from the menu. This opens the special properties dialog shown in the screen shot below.
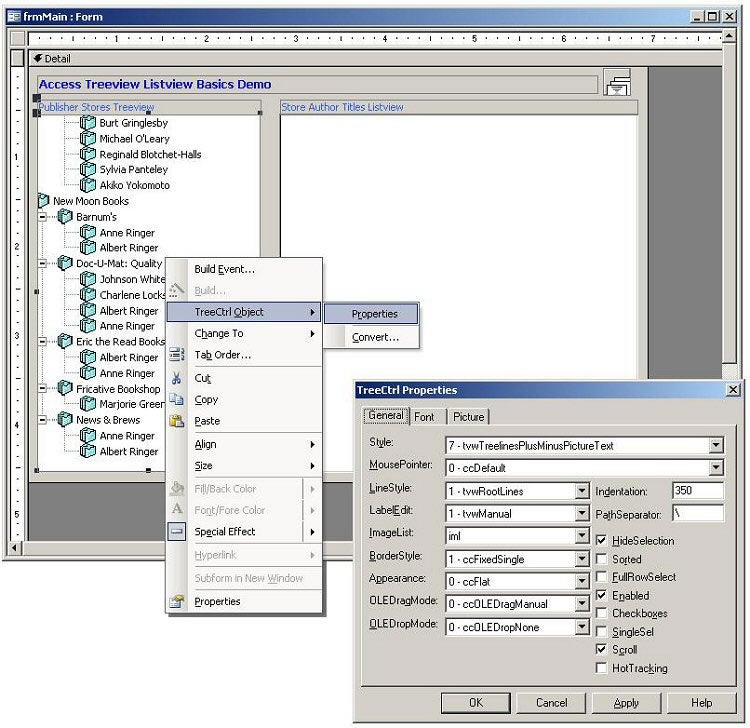
Setting these properties changes the way the control appears and behaves. The ListView control exposes additional tabs to control things like the widths for column headers, sorting and the like. I had a hard time finding help, as it did not seem to be installed. A search of the newsgroups revealed the files I needed, and where to get them, but even then, it didn’t seem to run on my machine. Here’s a summary of what I found. The version 5 files are included in the download, but here’s a site where you can download the latest files, if you can get them to work on your computer:
http://latium.dpi.ufv.br/downloads/C++IntroductoryEdition/VCB600ENU1/COMMON/HELP/?C=N;O=D
Ver 6 … CMCTL198.CHI
Ver 6 … CMCTL198.CHM
Ver 5 … comctl1.hlp
Ver 5 … comctl1.cnt
There’s so much more that could be written here … and so much more has. Remember, this article is just to get you started. There are many examples on the web, and MSDN even has some helpful articles. For now, having placed the controls on a form, let’s look at one example of using these controls.
The Code
Below is the entire code listing for the demo application. The only trick to it is the adding of what are called ‘Nodes’. Node keys must be unique, and from my experience, must be perceived by the control as being non-numeric. Accordingly, I’ve attached the bar character (|) to the ID numbers to ensure they appear to be text values.
The other thing to note in the code is how string values are used for comparison to determine when it’s time to create a new node. As we begin looping through the recordset, the previous value for strPName (publisher name) is compared with the current recordset value. If it’s different, a new node is created and the variables are updated. The same process is followed for the Store Node and the Author Node. After that, it’s just looping.
You won’t find any special events for the control, but they do exist. Accordingly, you simply have to code for them, as with this event procedure:
Private Sub tvwMyTreeView_NodeClick(ByVal Node As Object) The same is true for the ItemCheck event of the ListView control. However, the ListView control differs from the TreeView in that there are no nodes … just items, which are added through the ListItems.Add method. The best way to learn about how this works is to download the demo app, and step through the code. That’s pretty much what I had to do my first time.
Private Sub LoadMyTreeView()
    On Error GoTo Err_Handler
    Dim strSQL As String
    Dim dbs As DAO.Database
    Dim rst As DAO.Recordset
    Dim nod As Node
    Dim iNode As Integer
    Dim strPName As String
    Dim strPKey As String
    Dim strSName As String
    Dim strSKey As String
    Dim strAName As String
    Dim strAKey As String
    ‘ Clear the treeview nodes
    tvwMyTreeView.Nodes.Clear
    Set dbs = CurrentDb
    strSQL = “SELECT pub_name, stor_name, au_name, pub_id, stor_id, au_id ” & _
             “FROM qryPublisherStoreAuthor ORDER BY pub_name, stor_name;”
    Set rst = dbs.OpenRecordset(strSQL, dbOpenSnapshot)
    If Not rst.BOF Then rst.MoveFirst
    Do Until rst.EOF
         ‘ Add Publisher node
        If strPName <> rst!pub_name Then
            strPKey = rst!pub_id & “|”
            strPName = rst!pub_name
            Set nod = tvwMyTreeView.Nodes.Add(, , strPKey, strPName, “publisher_open”, “publisher_closed”)
            strSName = “”
        End If
        ‘ Add Store node
        If strSName <> rst!stor_name Then
            strSKey = strPKey & rst!stor_id & “|”
            strSName = rst!stor_name
            Set nod = tvwMyTreeView.Nodes.Add(strPKey, tvwChild, strSKey, strSName, “store”, “store”)
            nod.Tag = rst!stor_id
            strAName = “”
        End If
        ‘ Add Author node
        If strAName <> rst!au_name Then
            strAKey = strSKey & rst!au_id & “|”
            strAName = rst!au_name
            Set nod = tvwMyTreeView.Nodes.Add(strSKey, tvwChild, strAKey, strAName, “author”, “author”)
            nod.Tag = rst!au_id
        End If
        rst.MoveNext
    Loop
    ‘ Initialize ListView to empty recordset.
    LoadMyListView (“”)
Exit_Here:
    Set dbs = Nothing
    Set rst = Nothing
    Exit Sub
Err_Handler:
    MsgBox Err.Description, vbCritical, “ERROR”
    Resume Next
End Sub
Private Sub tvwMyTreeView_NodeClick(ByVal Node As Object)
    On Error GoTo Err_Handler
    Dim lngStor_id As Long
    Dim strAu_Id As String
    ‘ Grab the stor_id from the node’s tag property
    ‘ If null, set to zero.
    strAu_Id = Nz(Node.Tag, 0)
    ‘ Given we have a non-zero ID, load the listview control
    If strAu_Id <> “” Then
        Call LoadMyListView(strAu_Id)
    End If
Exit_Here:
    Exit Sub
Err_Handler:
    MsgBox Err.Description, vbCritical, “ERROR”
    Resume Next
End Sub
Private Sub LoadMyListView(ByVal au_id As String)
    On Error GoTo Err_Handler
    Dim strSQL As String
    Dim dbs As DAO.Database
    Dim rst As DAO.Recordset
    Dim lstItem As ListItem
    Dim strItem As String
    Dim strKey As String
    Dim intCount As Integer
    ‘ Remove all existing items
    While Me!lvwMyListView.ListItems.Count > 0
        Me!lvwMyListView.ListItems.Remove (1)
    Wend
    ‘open recordset of filtered Title/Authors
    Set dbs = CurrentDb
    strSQL = “SELECT title, title_id FROM qryTitleAuthor WHERE [au_id]='” & au_id & “‘”
    Set rst = dbs.OpenRecordset(strSQL, dbOpenSnapshot)
    ‘add each entry in the rs to the listview
    If Not rst.BOF Then rst.MoveFirst
    Do Until rst.EOF
        strItem = rst!title
        strKey = “ID=” & rst!title_id
        Set lstItem = Me!lvwMyListView.ListItems.Add(, strKey, strItem)
        intCount = intCount + 1
        rst.MoveNext
    Loop
    If intCount > 0 Then Me!lvwMyListView.ListItems(1).Selected = True
Exit_Here:
    Set dbs = Nothing
    Set rst = Nothing
    Exit Sub
Err_Handler:
    MsgBox Err.Description, vbCritical, “ERROR”
    Resume Next
End Sub
Private Sub lvwMyListView_ItemCheck(ByVal Item As Object)
    On Error GoTo Err_Handler
    Dim strSQL As String
    Dim iCurr As Integer
    Dim strKey As String
    Dim lngKeyID As Long
    For iCurr = 1 To Me!lvwMyListView.ListItems.Count
        If Me!lvwMyListView.ListItems(iCurr) = Item Then
            strKey = Me!lvwMyListView.ListItems(iCurr).Key
            MsgBox strKey, vbInformation, “Note”
        End If
    Next
Exit_Here:
    Exit Sub
Err_Handler:
    MsgBox Err.Description, vbCritical, “ERROR”
    Resume Next
End Sub
Barely scratched the Surface
There’s a lot to these controls, way more than what’s been described here. Below are a couple of MSDN references, and there are more to be had. The newsgroups were a great source for additional code samples and for suggestions on how to overcome errors in describing unique Node Keys, which seems to be the most common pitfall of the TreeView control.
Fill a TreeView Recursively
TreeView Drag and Drop
No, I’ll never be a Common Control guru, but such developers exist. I work with one such expert, and he has shown me an app that programmatically changes icons, column headers, sort orders and much, much more. I’m in awe of what can be accomplished by the TreeView and ListView controls. It may be just the tool you need to finish your application, but be advised, the learning curve is anything but trivial.