


In Part 1,
I covered some of the operational requirements for using Data Guard and the
options (physical and logical) you have in deciding which type of standby
database you want to employ. Part 2 starts off with step-by-step coverage of
preparing your environment for Data Guard.
One of the driving factors for using Data Guard is to
survive a catastrophic loss of a primary system. With that in mind, having the
standby database, whether it is physical or logical, and for that matter,
whether you use more than one standby database, on the same machine or server
does not exactly provide the best or most coverage. However, there are reasons
why you would maintain a standby on your primary’s platform.
One reason is for simple convenience. If you have a server
with multiple disks (and the CPU horsepower to run multiple instances), you can
send archived logs to the other disks on the server as well as to a separate
location(s). If your primary suffers a failure, you have a standby database
right there in front of you ready to go. This does not relieve you of the
responsibility to maintain a standby in a different location.
Another reason concerns whom the DBA performing the clean up
is – maybe it is a contract hire brought in for a couple of weeks while you are
on vacation, or a junior DBA working the graveyard shift. There will be enough
panic to go around, so one disaster recovery consideration may be to eliminate
remote server/network/file system access obstacles.
And yet another reason, which if you are still reading the
article at this point, is for educational purposes. For learning purposes, your
main goal is to make Data Guard work, even if it is a simple implementation.
Once you have the basics covered and are familiar with the underlying
requirements (e.g., running in archivelog mode) and where you can find
important bits of information (in the V$ views for Data Guard and for running in
archivelog mode), you can expand your horizons and experiment with more
sophisticated implementations.
Therefore, I thought it would be instructive to start from
scratch, and by that, I mean create a simple database and enable it for
archiving redo logs. There are several key steps related to database (or
operating system) authentication, configuration of Net Services, and because
this example is on Windows, use of an Oracle executable to create a service.
Additionally, creating a database outside of using a GUI assistant is always
good practice. At the end of the following steps, we will have a simple
database to serve as the primary and have it ready to go for Data Guard. I will
not go into a lot of detail on some of the preliminaries because they have been
covered in previous articles. The only real prerequisite is that you have
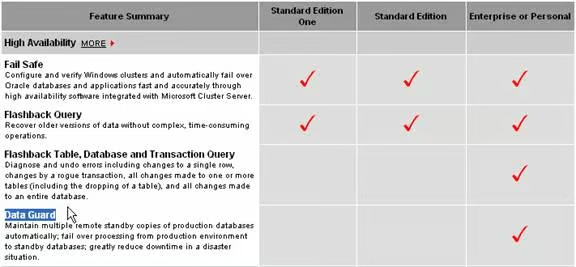
Oracle9i (9.2.0.1 or higher) already installed. Which edition was that? If you
are not sure about which features are available in a particular edition, pay a
visit to Oracle’s Web site (http://www.oracle.com/database/product_editions.html).
Ensure Sufficient Privileges
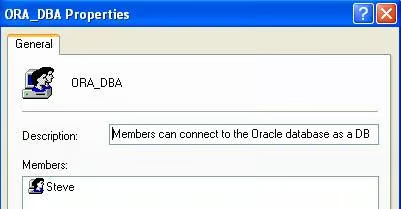
Include yourself in the ORA_DBA group (or the dba group on
UNIX if you are not “su-ing” in as “oracle” or the owner of the software
installation). Set the authentication parameter in the sqlnet.ora file to NTS.
You need to connect as sysdba during the database creation steps, so make sure
that is in order.

Configure Net Services
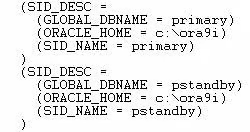
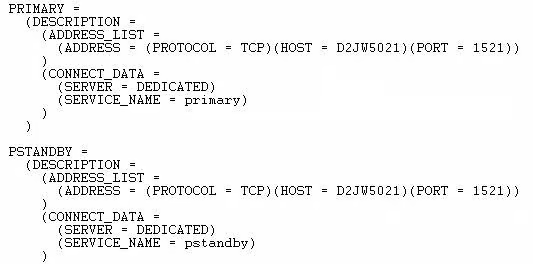
Aside from the sqlnet.ora file, setup the listener and tnsnames.ora
files with both the primary and standby database information. I chose the
imaginative names of “primary” for the primary database and “pstandby” for the
physical standby database.
| Listener.ora entries |
|---|
 |
| TNSNAMES.ORA ENTRIES |
|---|
 |
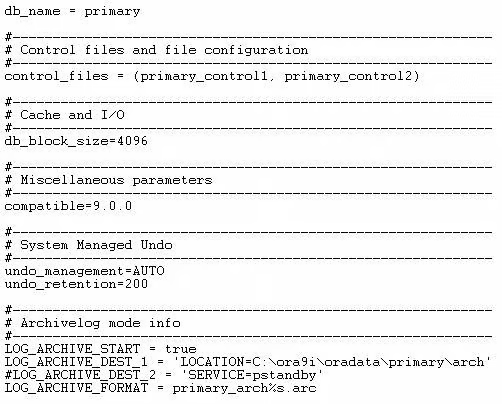
Create an Initialization Parameter File
For now, we will keep it simple, as we only need a simple
database. Use the default location of ORACLE_HOME\database (what is the directory
name on UNIX?).
Create a Service on Windows
Use the oradim command and tell Oracle you will be using an init.ora
file. The command to create a SID named primary, with an internal password of
oracle, using a startup mode of automatic, and using a parameter file named initPRIMARY.ora
in the location specified is (ORACLE_HOME is C:\ora9i):
oradim -new -sid primary -intpwd oracle -startmode a -pfile c:\ora9i\admin\initPRIMARY.ora
Verify the service is running via the Services control panel.
![]()