Synopsis.
The Data Guard feature set has been expanded dramatically in Oracle Database
11g to make it even easier for an Oracle DBA to control and monitor any
complex, multi-database disaster recovery environment. This article – the third
in this ongoing series – demonstrates how to extend an existing Data Guard
Broker configuration into an Oracle 10g Enterprise Manager Grid Control
environment as well as how to configure the appropriate level of data protection
between Oracle 11g primary and standby databases.
The prior
article in this series explored how to use Oracle 11g’s Data
Guard Broker (DGB) utilities to configure, monitor, and maintain
relationships between the two database environments. This article will discuss
how to:
-
Configure data
protection modes between the primary and standby databases -
Set up Oracle Enterprise Manager Grid Control for management of a Data
Guard environment -
Perform role
transitions using Oracle Enterprise Manager Grid Control
Data Protection Modes
Before
I demonstrate how to perform role transitions using Enterprise Manager Grid
Control, it’s an appropriate time to review how Oracle 11g Data Guard balances redo log application
synchronicity versus safety to guarantee the appropriate level
of data protection, availability, and performance for both the primary database and
its standby database(s). Oracle 11g
offers three different modes of data protection:
Maximum Performance Mode. When a company is
willing to trade the need for immediate transaction recoverability on the
standby database for the best possible performance of the primary database,
this is probably an appropriate choice – for example, in the case of a decision
support or moderate OLTP environment. It’s also the default data protection mode, and it allows Oracle 11g to commit a transaction as soon as the
redo for that transaction has been written to the primary database’s local
online redo log. Of course, these transactions are eventually written to the
standby database(s) as well, but since they are written asynchronously, the
primary database doesn’t have to wait for acknowledgment of the transactions’ committal.
This is a viable option so long as there’s sufficient network bandwidth between
the primary and standby database(s).
Maximum Availability Mode. A company or
organization may decide that at least some primary database performance can be
sacrificed in favor of improved transaction recoverability on the standby
databases. This next level of data protection offers a compromise because it
insures that a transaction is not considered as committed until its redo log entries have been written to the primary
database’s local online redo log as well as at least one standby database’s
standby redo log. The primary database stays active at all times
even if the transmission of redo log data is disrupted temporarily to the
standby database because Data Guard will continue to attempt the transmission to
the standby until all redo “gaps” are resolved satisfactorily. This is the most
viable option when the performance of the primary database needs to be balanced
against the secure knowledge that redo synchronization will eventually take place – for example, an
internet-based customer order placement system.
Maximum Protection Mode. When an
organization needs to insure that not even one byte of committed data can ever
be lost, this is the only appropriate mode because it provides the most extreme
protection against any data loss … at a cost. Data Guard will insure that no
data loss occurs even if the primary
database itself should fail because it insures that all redo has been written to the local online redo
log as well as the standby redo
log of at least one standby
database in the Data Guard configuration and, if it cannot satisfy this
request, it will automatically shut down the
primary database to insure no additional transactions will be
accepted. Therefore, to prevent the primary database from shutting down
unexpectedly, Oracle recommends configuring at
least two standby databases. This option is almost certainly
required for financial systems in which complex commodity or equity
transactions must absolutely be guaranteed.
The
appropriate data protection mode is directly influenced by the redo transport mode that’s been specified
for the Data Guard configuration. Table 3.1
below summarizes the combined impact of these settings.
|
Table 3-1. Redo |
|||
|
Data Protection Mode |
Synchronicity |
Acknowledgement |
Minimum Standby DBs |
|
Maximum Performance |
ASYNC |
NOAFFIRM |
1 |
|
Maximum |
SYNC |
AFFIRM |
1 |
|
Maximum Protection |
SYNC |
AFFIRM |
2 |
Since
my major focus in this article series is concentrated upon quicker
demonstrations of the various Oracle 11g
Data Guard features, for now I’ll leave my Data Guard data protection mode at
the default level of maximum performance.
However, I promise to return to this topic when I discuss the benefits of
implementing Data Guard in a Real
Application Cluster (RAC) environment in the final articles in this
series.
Configuring EM Grid Control Agents
Before
I can demonstrate how to perform switchover or switchback operations with Grid
Control, I’ll need to install and configure an appropriate Grid Control agent on both hosts. To
accommodate this, I first installed version 10.2.0.1 Oracle Enterprise Manager
Grid Control agents on the primary and standby hosts using Oracle Universal
Installer. I then applied patch set #3731593 to the Grid Control agents on both
hosts to upgrade them to version 10.2.0.4. This permitted my existing Oracle
10.2.0.4 Grid Control infrastructure to partake in their management. Once the
agents were successfully started and my Grid Control Oracle Management Server
(OMS) was able to communicate with them, the Enterprise Manager Grid Control
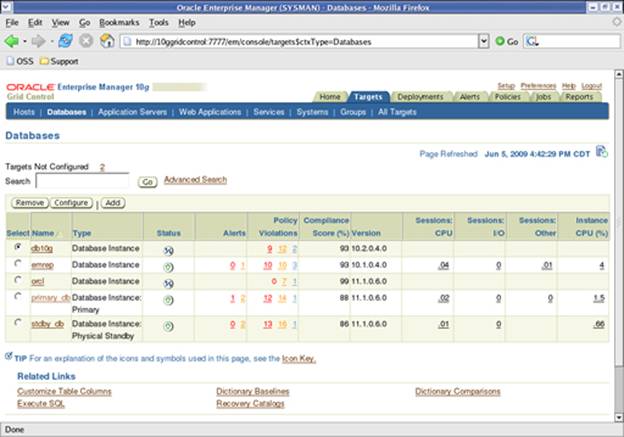
console’s Targets:Databases
panel displayed them as valid targets:
Figure 3-11. Successful Addition of Primary and Standby Databases to EM Grid Control
To
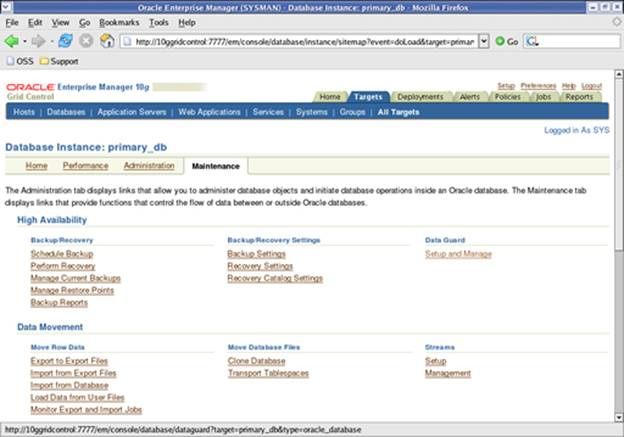
access the Data Guard configuration for my primary and standby databases, I’ll
connect to my primary database and navigate to its Maintenance tab, as
shown in Figure 3-12 below.
Figure 3-12. Managing the Data Guard Configuration
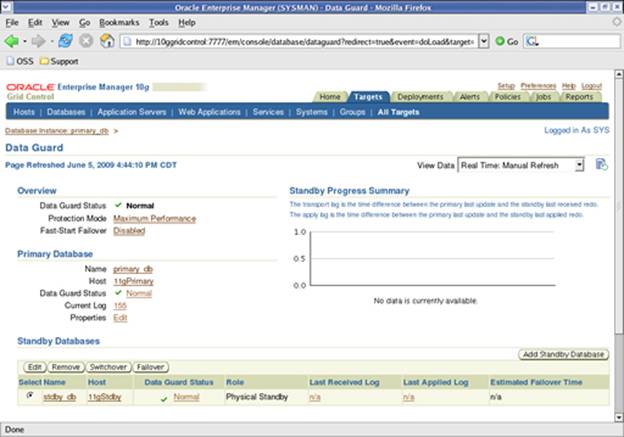
Once
I select the Setup and Manage
link from the Data Guard
section from the Maintenance
tab, I’m presented with current status of the Data Guard environment, as shown
in Figure 3-13.
Figure 3-13. Viewing Current State of Data Guard Configuration


