


Sooner or later, every Access VBA developer is asked to make
Access play nice with Microsoft Outlook. Sending emails from Access is popular
but so is creating appointments, tasks and contacts. The ability to read and
process Outlook emails is also very useful, as is the ability to extract names
and emails from the user’s contact list. That’s the topic covered in this and
next month’s articles. The code for both articles is available now in this download.
This month’s installment describes the process to accomplish
the following three tasks:
- Create Outlook Application object
- Create an Outlook Item and set its properties
- Circumvent Outlook Security on mail items
The Outlook Application Object
In this demonstration we will use “late binding,” which
means it’s not necessary to set a reference to the Outlook library. This has
the advantage of allowing for different versions of Outlook on end-users’
machines, as is the case in some implementations.
The first step is to create an Outlook application object.
With late binding, this in accomplished by using the CreateObject() or
GetObject() method. GetObject is used to attach to an instance of Outlook that
is currently active. If that fails because Outlook doesn’t happen to be open,
then CreateObject must be used to open and instantiate it. For this process to
run smoothly, error handling must be turned off and errors dealt with inline. See
the code below.
    Dim oOutApp  As Object
    Dim sMsg As String
    ‘ We turn Error Handling OFF so we can attempt
    ‘ a call and test for errors.
    On Error Resume Next
    ‘ If Outlook is already open, then use GetObject
    ‘ to set a reference to it, first with a generic
    ‘ call … then by specific application if need be
    Set oOutApp = GetObject(, “Outlook.Application”)
    ‘ If there was an error, then GetObject failed.  This
    ‘ doesn’t happen often, but when it does it may sometimes
    ‘ be compensated for by adding the specific Access
    ‘ version number to the GetObject call, as shown here.
    If Err.Number > 0 Then  ‘  Outlook 97 version
        Err.Clear
        Set oOutApp = GetObject(, “Outlook.Application.9”)
    End If
    ‘ Still errors out?  Try something else …
    If Err.Number Then
        Err.Clear
        ‘ If code failed to “Get” an instance of Outlook,
        ‘ then it isn’t currently open and we must use
        ‘ CreateObject to open and set a reference.
        Set oOutApp = CreateObject(“Outlook.Application”)
    End If
If this fails, then there’s a real problem like Outlook not
being installed. None of this code will work if the user doesn’t actually have
a valid version of Microsoft Outlook and I’ve seen this fail where there is an
installation glitch. Either way, this proc should return a failure and exit if
the Outlook Application object cannot be created.
The Outlook Item Object
Now that we have a function to grab the Outlook application,
we can do stuff with it. I’ll only talk about 2 examples here, but all of them
are implemented in the download for this article. The only two differences
between the various types of Outlook objects are:
1. The item
properties available to be set
2. When
it’s necessary to circumvent Outlook security
In the demo code, I’ve created 4 constants, one for each
type of Outlook item I plan to manage. If you use early binding there are
built-in constants but with late binding, we must describe our own. Of course,
you could always just use the numeric literals but using a named constant
contributes to self-documentation. The constant is then passed to the CreateItem()
method of the Outlook Application object and the result is an Item object that
we may work with.
    Const cMailItem As Long = 0
    Const cApptItem As Long = 1
    Const cContItem As Long = 2
    Const cTaskItem As Long = 3
    Set oItem = oOutApp.CreateItem()
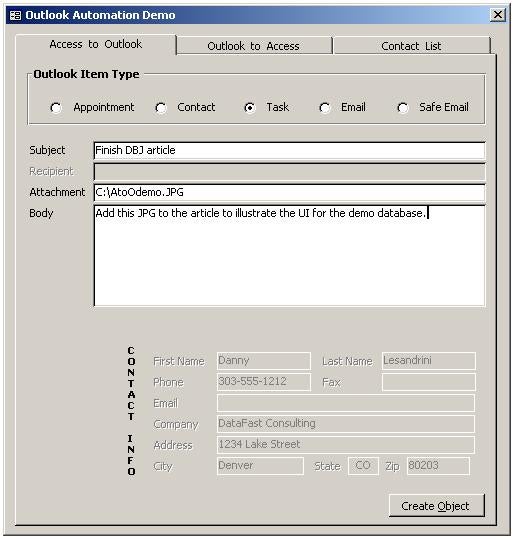
The first example shows how to create a task and set some
properties. The property values must be collected from somewhere, but once you
have the subject, body, date and any other attributes, it’s as simple as this:
    Set oTask = oOutApp.CreateItem(cTaskItem)
    With oTask
        .Subject = sSubject
        .Body = sBody
        .StartDate = dDate
        ‘ Yes … a task may have an attachment
        If Len(sAttach) > 0 And Dir(sAttach) <> “” Then
            .Attachments.Add sAttach
        End If
        .Save
        .Display
    End With
    Set oTask = Nothing
Notice the last two properties set in this example: Save
and Display. These should be set according to what you want to accomplish. If
neither property is set, the object will simply go away when the function ends
so you must either save the item or display it so the user may save it or as in
this example, both save and display the task item.
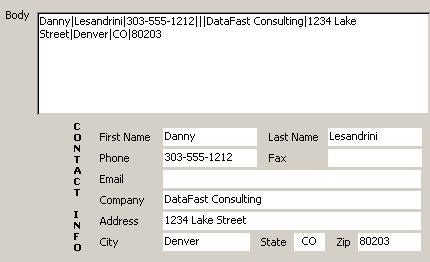
While the other Outlook items behave similarly and some of
the properties are identical, there is one programming note to mention
regarding the demo application. There are so many properties for a contact that
it really should have its own function but I desperately wanted to reuse the
same public function for other item types. As a result, I perform some magic
by placing a pipe delimited list of attributes in what is usually considered to
be the message body. When a Contact Item is requested, this text is split into
the attributes necessary to create a contact. This is a little kludgy, but it
works.
The image below taken from the demo illustrates how the
compliment of contact properties are munged into a single string in the message
body. I’ve implemented this in a production application and it works well, but
it’s the kind of thing one must clearly document or it will be confounding to developers
assigned to maintain the code.
After clicking the Create Object button on the demo form, a
new task will be saved and displayed with all of the data pulled from our demo
form.
Outlook Security Be Gone!
Remember the “I Love You” virus from the spring of 2000? It
was a mean one that leveraged the user’s Outlook email and contact list to
disseminate itself. It seems it was shortly after that attack that Microsoft
added the following warning message anytime an application tried to use Outlook
through automation.
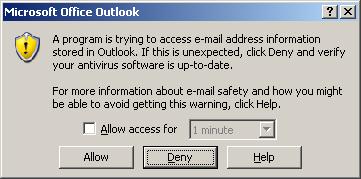
Now if you don’t mind having your users answer this question
and if you appreciate the extra security, then you can skip the next
discussion. However, if you’d like to see how to code around this restriction,
you’ll need to implement the Redemption library and read on.
The download for this article includes the Redemption.dll
library and a readme file that explains how to register it. I usually copy the
dll to a new folder named Redemption in the Program Files folder for all machines
on my network. Then the library must be registered by executing this statement
in the Run dialog:
regsvr32 "C:\Program Files\Redemption\Redemption.dll"
You will need to follow the prompts and agree to the license
conditions but after that, you may use the Redemption library with your Outlook
item object instantiation code. In a nutshell, you create two objects: one
Outlook item as above and one Redemption safe item. Set the safe item object
equal to the Outlook item object and proceed as usual using the safe item. The
Redemption library takes care of the security warning issues for you. Here’s
what the code looks like for sending a safe email:
    ‘ Notice that Late Binding is used with both objects
    Set oMail = oOutApp.CreateItem(cMailItem)
    Set oSafe = CreateObject(“Redemption.SafeMailItem”)
    Set oSafe.Item = oMail
    ‘ you may add an attachment without the safe object.
    If Len(sAttach) > 0 And Dir(sAttach) <> “” Then
        oMail.Attachments.Add sAttach
    End If
    With oSafe
        ‘.Recipients.Add sRecip
        .To = sRecip
        .Subject = sSubject
        .Body = sBody
        .Send
        .Display
    End With
Now it should be noted that only a few actions will trigger
the security warning. Attaching a file to a mail item doesn’t but attempting
to Send an item does. So for this example, if you comment out the .Send action
above, the Redemption object is not really necessary. You can create an email
and display it to the user for action without any special treatment but if you
want to send things secretly or want to interrogate the Contact list, you’re
going to need this layer.
From here …
The code above is very basic and doesn’t answer questions
like, “How can I set a reminder to an appointment item?” or “What’s the property
to require a Read Receipt on an email?” These and other questions may be
answered by querying the news groups but there is a faster way involving
something we’ve avoided up to this point; early binding.
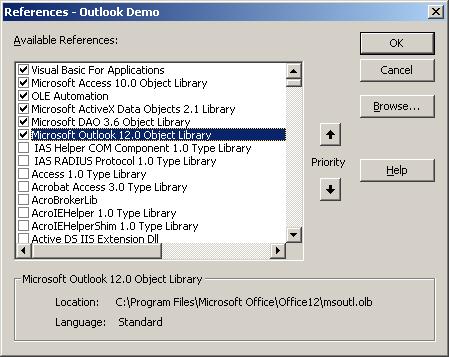
To implement early binding you need to set a reference to
the Microsoft Outlook library on your computer. If you don’t actually have
Outlook installed, this won’t work and for that matter, neither will any of the
code above. So since we are assuming that Outlook exists on your system, set
a reference to it by doing the following:
1. Open
any code module. (shortcut = Ctl+G)
2. Select
References from the Tools menu
3. Scroll
down the list until you find Microsoft Outlook V.0 Library
(look for your version number in the reference)
4. Check
the box and click OK to save the reference.
Now, with a reference to the Outlook library bound to your
project, you may interrogate the library classes using the Object Browser.
Press F2 from any code window to open the Object Browser. This interface
allows you to select one of the referenced code libraries and enter text to
search on.
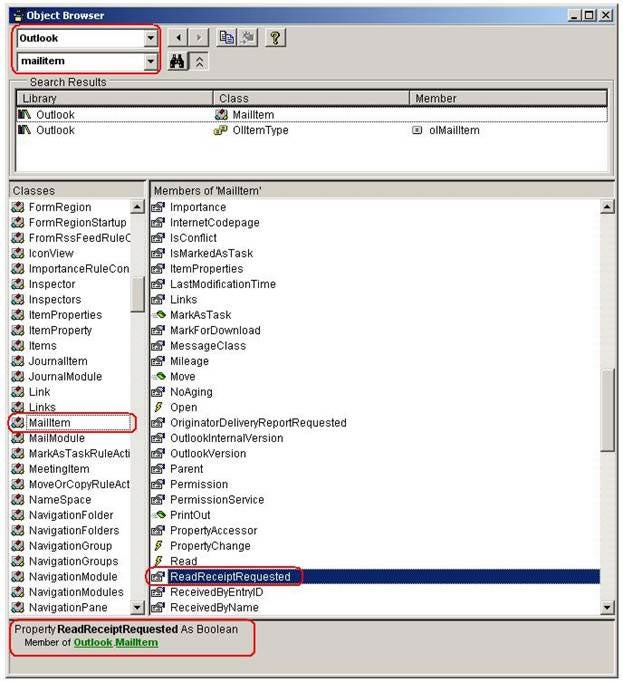
In our example, we want to know if there is a property to
force a Read Receipt on a mail item, so I enter the search text for MailItem
and click on the binoculars icon. Outlook MailItem is one of the objects found
and selecting that entry updates the lower part of the browser with information
about the MailItem class. Scrolling down the list we find the property ReadReceiptRequested.
Selecting it loads additional information about the property in the bottom pane
where we see that it is a Boolean value. So it stands to reason that we can
require a Read Receipt with the following call:
oMail.ReadReceiptRequested = True
This is a great way to learn about what may be done with
various Outlook classes but if you want to use late binding and not worry about
which version of Outlook your users have, you’ll need to remove the reference.
I had been using this Object Browser in the demo application with a reference
to Outlook 12 (Office 2007) and nearly forgot to remove it before distributing
the demo. If I had forgotten, anyone who tried to open the demo mdb without
Outlook 2007 installed on their machines would not have even been able to load
the main form, let alone run any of the Outlook automation code.
This concludes the discussion of putting things into
Microsoft Outlook from Access but there’s more to come. Next month we’ll see
how to get data (like emails and contacts) from Outlook into Microsoft Access.
If you can’t wait, then download the demo file for this month and give it a
look. The Outlook To Access code is already there in the demo but watch this
site for the full explanation in July.