


Sometimes an application may need data stored in another
database on a different instance of SQL Server. That different instance might
be on the same physical machine or might be on another machine altogether. So
what do you do in this situation? Your options depend on your data
requirements, like how up to date does the data need to be. Also, the
network/computer topology might be a factor in what you can and cannot do. To
discuss all the different possible options would make this article quite lengthy
so let me narrow down the scope a little bit. For the purpose of this article,
I will be discussing how a linked server can be used to seamlessly provide an
application access to data on a different instance of SQL Server. Note linked
servers can also be used to access other non-SQL Server data sources, but that
notion will be outside the scope of this article. I will only be discussing
options and situations related to using linked servers to access information
stored in a SQL Server database.
Basic Linked Sever Architecture
Before I get into how to setup a linked server, let me
discuss the basic architecture of a linked server. A linked server is a
mechanism that allows a query to be submitted on one server and then have all
or part of the query redirected and processed on another SQL Server instance,
and eventually have the results set sent back to the original server to be
returned to the client. To better show how this works look at the following
diagram:

In this diagram, a “Client” can connect to either an
“Application Server” or directly to SQL Server to submit a query. If the
“Client” or application running on the “Application Server” submits a query to
“SERVER1” that needs to retrieve data from a database housed on “SERVER2”, then
this kind of query is known as a distributed query. Defining a linked server
definition for “SERVER2” on “SERVER1” allows for a client or an application to
submit these kinds of distributed queries. A distributed query that runs
against “SERVER2” from a linked server defined on “SERVER1” would look something
like this:
SELECT name "DBs on SERVER2" FROM SERVER2.master.sys.databases
Here I identify the object I want to reference on my linked
server by using a four part naming convention. In my example, I wanted to
return the names of all the databases on “SERVER2”. Therefore, I used a four
part naming which consisted of <linked
server>.<database>.<schema>. <object>, or in my case “SERVER2.master.sys.databases”.
“SERVER2” is the name of the linked server, which is defined on “SERVER1”.
How to Define a Linked Server
To create or list the available linked servers already
defined you look under the “Server Objects” folder within SQL Server Management
Studio (SSMS). You can also use “sp_addlinkedserver” system stored procedure
to add a linked server, or “sp_helpserver” to list linked servers.
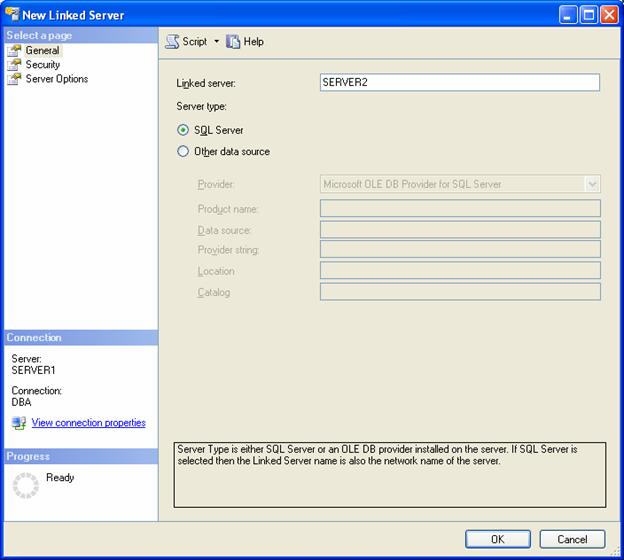
To create linked “SERVER2” in my above example in SSMS, I
would first expand the “Server Objects” folder, and then right click on the
“Linked Servers” item. This would display the following window:

On this window, you name your new linked server and identify
the type of data source your linked server will be. Remember linked servers
can be defined for a number of different kinds of data sources. For the
purpose of this article, I will be defining “SERVER2”, which is a SQL Server
data source. In order to do that I will need to identify the name of the
linked server and then use the “Security” and “Server Options” pages to
define how I would like to authenticate to my linked server and what options
will be associated with my linked server. To begin defining my linked server
I enter “SERVER2” in the “Name” field and then click on the “SQL Server” radio
button to identify that my new linked server is a SQL Server data source. When
I do that my window looks like this:
To define how clients would authenticate to “SERVER2” I
would click on the “Security” item in the upper left hand corner of this page,
under the “Select a page” section. When I click on the “Security” item, the
following page is displayed:
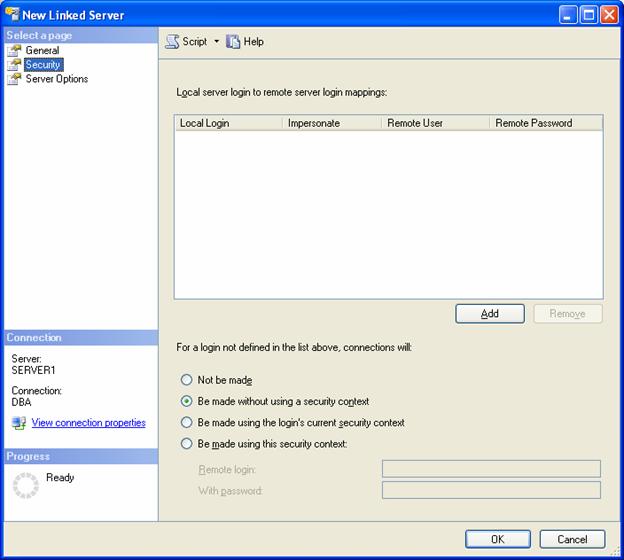
Here you have a number of different ways to identify how
your clients would be authenticated to the linked server. Let me go through
each one of these options.
At the top of this screen, in the right hand pane you can
define login mappings. Login mapping is a way to associate a login on the
local server, with a login on the remote server. There are two different ways
a local login can be mapped to a remote login. The first method is to
impersonate, and the second is to associate the local login with a remote login
and password. The impersonate option takes the local Windows login and uses it
to connect to the linked server. It does this by impersonating the local
login. In order for the local server to impersonate, the login requires that
delegation be setup between the local server and the linked server. A
discussion on delegation is outside the scope of this article. To map a local
login you would associate it with a remote login and password. The remote
login needs to be a SQL Server Authenticated user on the remote server. The
following screen shot shows how I have mapped some local logins to remote
logins on SERVER2:
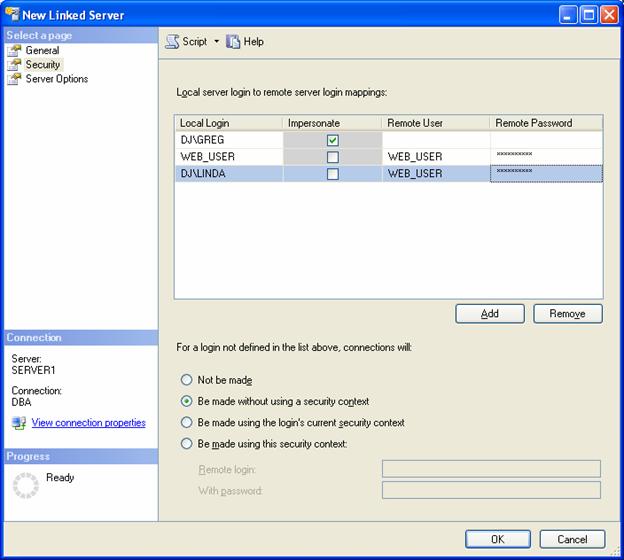
Here I have mapped three different local logins to two
different remote logins. The first login mapping is for “DJ\GREG”, which is a
Window domain authenticated user that is defined on the local server. I’ve
identified the mapping so “DJ\GREG” is to be impersonated when connecting to
“SERVER2”. This means anytime “DJ\GREG” is logged onto SERVER1 and issues a
linked server query to “SERVER2” those request will connect and run the query
on “SERVER2” in the security context of “DJ\GREG”. The second mapping is for
“WEB_USER” which is a SQL Server authenticated user. I’ve mapped “WEB_USER” to
the same remote login. In doing so, I had to provide the password for login
“WEB_USER”. This password must be the password for the “WEB_USER” on linked
server, in my case that would be “SERVER2”. The third login mapping
demonstrates how you can map multiple local logins to a single remote login.
In my example I mapped the Windows domain authenticated login “DJ\LINDA” to the
remote login “WEB_USER”. Using mapped logins is a way to identify only those
users from the local machine that can connect to the linked server.
In addition to mapping logins, you can also identify how
logins that are not defined in the mappings would connect to the linked server.
There are four different options that can be used. These four options are the
different radio buttons in the screen shot above.
The first option “Not be made” is fairly obvious. When you
select this option, any users not identified in the login mappings will not be
able to connect to the linked server. The second method “Be made without
using a security context” is to be used for connecting to data sources that do
not require any authentication, like a text file. If you select this option to
connect to a linked server then this has the same effect as selecting the “Not
be made” option. The third option “Be made using Login’s current security
context” means you want the linked server request to use the Windows account of
the login to connect to the linked server. In order for this option to work,
your SQL Server machine will need to be able to impersonate a local account.
This option is a simple way to identify that all Windows accounts can use a linked
server, without mapping each login. However, remember this requires delegation
to be set up. The last option “Be made with this security context” is a way to
say everyone using this linked server will connect with a single remote login
and password to the linked server. The remote login needs to be a SQL Server
Authenticated login.
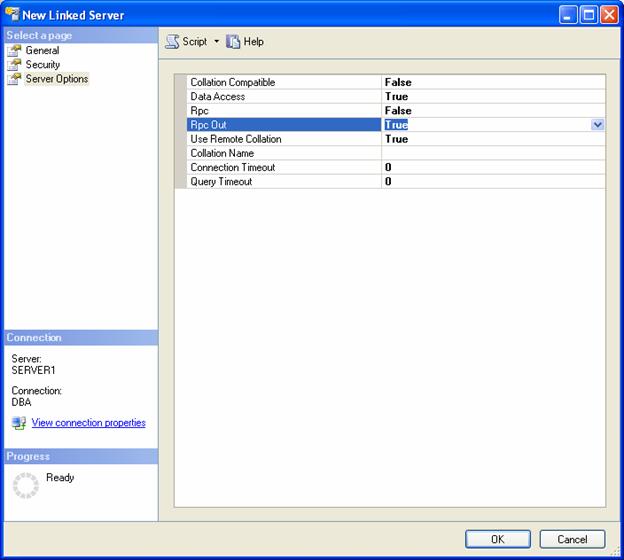
When setting up a linked server the last thing to consider
is defining the “Server Options”. This can be done by clicking on the “Server
Options” under the “Select a page” menu. When I do that, the following screen
will be displayed:
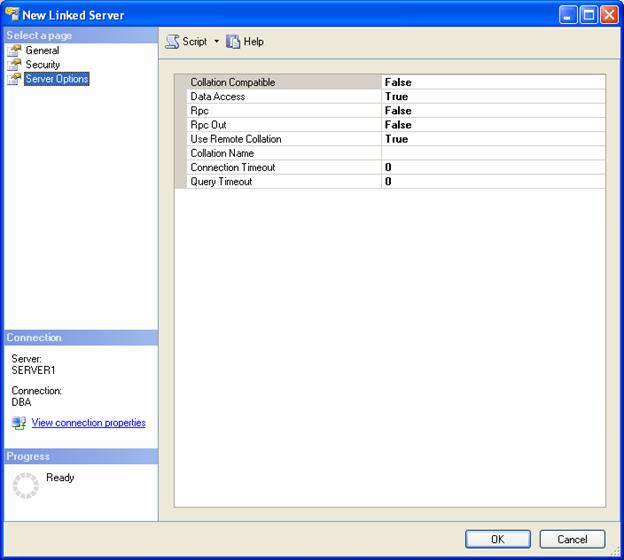
On this screen, there are a number of different options. The first option, “Collation
Compatible,” is used to identify whether or not the linked server has the same
collation as the local server. You should only set this to “True” if you know
the local collation is the same as the linked server. The next option “Data
Access” is used to control whether you want to allow data to be accessed on the
linked server. When this option is set to “True”, the linked server can be
used to access data on the remote SQL Server instance. When this option is set
to “False” then access to the remote server will be denied. This option is a
useful way of disabling a linked server temporarily. The next option “Rpc” is
used to allow remote procedures calls “from” the linked server. Whereas, the
option after that “Rpc Out” is used to allow remote procedure calls “to” the
linked server. The “Use Remote Collation” option when set to “True” means that
the collation setting of remote columns will be used, but when this option is set
to “False” the collation settings for the local server will be used. The
“Collation Name” option is to specify the collation setting of the linked
server. When specifying a collation name it must be a collation that SQL
Server supports. The “Connection Timeout” is used to specify the maximum
length of time the local server should wait to obtain a connection to the
linked server SQL Server instance. If “0” (zero) is specified for this option
then the server option “remote login timeout” is used. By default the server
option default is 20 seconds for the “remote login timeout”. The “Query
Timeout” option is used to specify the length of time a linked server process
will be allowed to run before it times out. When this option is set to “0” (zero) then the server “remote query timeout” is used. The “remote query timeout” value defaults
to 600 (10 minutes).
On my SERVER2 linked server, the only option I need to
change is “Rcp Out”. I need to change this so I can run stored procedures that
reside on SERVER2. Therefore, to do this I would have to change the “Rcp Out”
option to true like so:
Once you have specified a linked server, the security
associated with the new linked server, and the server options you are ready to save
your new linked server definition. This is done by clicking on the “OK” button
at the bottom of the “New Linked Server” window.
TSQL Examples for Using Linked Servers
Above I defined a linked server named “SERVER2”. As stated
earlier, in order to reference objects on “SERVER2” I would need to use a four
part naming convention. Below are some examples of how to referencing objects
on SERVER2.
Here is how I would retrieve information in the “Product”
table in the “AdventureWorks” databases stored on my linked server:
SELECT * FROM SERVER2.AdventureWorks.Production.Product
All you have to do here is put the linked server name
followed by a period before the fully qualified table name.
If you wanted to execute a stored procedure on a linked server,
you would do something like the following:
EXECUTE SERVER2.AdventureWorks.dbo.uspGetBillofMaterials 718,'2000-06-26'
Here I have executed the uspGetBillofMaterials stored
procedure on SERVER2.
Conclusion:
Linked Servers allow you to submit a TSQL statement on one SQL
Server instance, which retrieves data from a different SQL Server instances.
In fact, linked server can be used to join data from multiple SQL Server
instances using a single TSQL statement. When you have databases on multiple
SQL Server instances, you might find it useful to use linked servers in your
application to retrieve data from more than one instance. By using a linked
server your application will only need to connect to one SQL Server instance to
retrieve data from multiple SQL Server instances. On that single SQL Server instance,
you would define linked servers so your application could retrieve data from
the databases that reside on a different SQL Server instance. Next time you
are considering how to handle retrieving data from multiple instances of SQL
Server from a single connection or single TSQL statement you might consider
looking into using a linked server.
»
See All Articles by Columnist Gregory A. Larsen