


Introduction
A SQL Server VIEW can be thought of as a saved query that
returns a virtual table. This virtual table can be treated like a real or
regular database table. In other words, the VIEWs results can be presented to
an end user as is, or they can be re-queried to further limit the rows returned
or apply grouping and ordering clauses. So we can create a TSQL statement such
as “SELECT * FROM myView ORDER BY col”. In addition, data can be added to the
database through a VIEW. This article will examine the syntax and options used
in creating SQL Server VIEWs.
Why use a VIEW
A VIEW is a convenient way to give a user only partial
access to a table. The VIEW can restrict the rows being returned as well as
the available columns. So granting the user access to the VIEW rather than
the table will effectively restrict their access. VIEWs are also a handy
method for hiding a complex statement and only presenting the end user with a
simple one-table result set.
Creating a VIEW
Views can be created with TSQL statements or graphically
through the SQL Server Management Studio. For this first example, we’ll use
the Management Studio and the Adventure Works database (Adventure Works is a
free test database from Microsoft). To begin, start the Management Studio,
expand Databases, expand Adventure Works and then right Views, and select New
View. This will bring up the Add Table dialog box. For this example, we’ll
select the Person.Contact table. Click Add and then Close. This will leave
us at the graphical designer shown below.
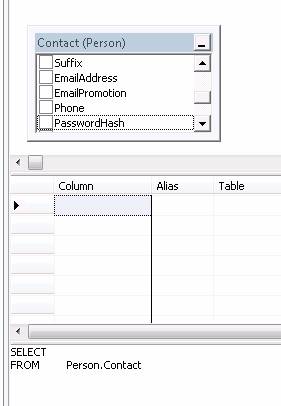
Four different panes comprise the interface. The top pane
is the Designer where tables and columns can be selected. The second pane,
Criteria, can used to filter and sort. The third pane, SQL, presents the TSQL
statement created by our graphical choices. The final pane, Results, will
display the data returned from the statement.
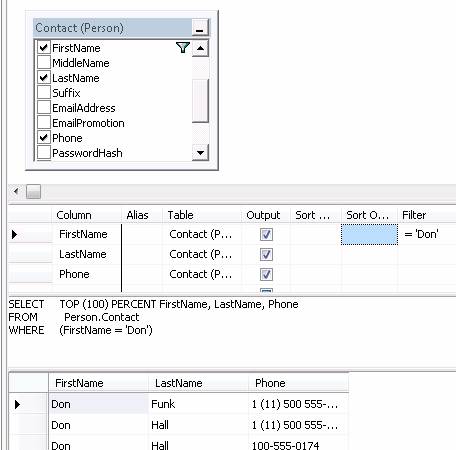
In this first example, we’ll create a phone list of all the
contacts with the first name of Don. Select the First Name, Last Name, and
Phone Number columns in the Designer pane. The Criteria and SQL panes will
automatically populate with the choices. In the Criteria pane, enter “=Don” in
the filter column of the First Name row. To execute and test the statement,
click the red explanation mark icon. The statement should look like the image
below.
The statement can be edited in any of the three top panes.
For example, in the SQL pane change the WHERE statement to perform a LIKE and
re-execute. One hundred and thirty three rows will be returned.
SELECT     TOP (100) PERCENT FirstName, LastName, Phone
FROM         Person.Contact
WHERE     (FirstName LIKE ‘Do%’)
Once the statement is complete, click the save icon from the
top menu bar, a Chose Name for a View dialog will open. Enter the name TestView
and then click OK. Refresh the View list and the new view appears. Right
clicking the new View will bring up a dialog box similar to a Tables dialog as
shown below.

Creating a view with TSQL commands is very strait forward.
The syntax is simply:
CREATE VIEW view_name
AS
Select_statement
So the first example would be:
CREATE VIEW TestView
AS
SELECT     TOP (100) PERCENT FirstName, LastName, Phone
FROM         Person.Contact
WHERE     (FirstName LIKE ‘Do%’)
When creating a view, most of the normal commands
used in a SELECT are available, such as JOINS and Aliases. This means we take
a very complex statement, save it as a VIEW, and thereafter only work with the
simpler table it returns, thus hiding the complexity of the original
statement. There are a few commands that are not allowed when creating a VIEW.
The INTO keyword cannot be used as well as any reference to a temporary table.
In addition, ORDER BY is not allowed. (When creating VIEW from the GUI, it
will let you specify an ORDER BY, but it will not be saved.) Any Ordering will
need to be done in the SELECT statement built off the VIEW.
SELECT From VIEW
Right click the new view and select “SELECT top 1000 rows”.
The following statement will be created and its results returned.
/****** Script for SelectTopNRows command from SSMS  ******/
SELECT TOP 1000 [FirstName]
      ,[LastName]
      ,[Phone]
  FROM [AdventureWorks].[dbo].[TestView]
Notice how the syntax for selecting results from a VIEW is
identical to selecting items from a table. This is one of the benefits of
working with a VIEW. All of the usual table commands such as GROUP BY and
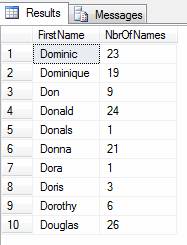
ORDER BY are available when selecting from a VIEW. For example, this next
statement does a typical GROUP and COUNT, but based on the newly created VIEW
rather than a table.
SELECT FirstName, COUNT(FirstName) as NbrOfNames
FROM TestView
GROUP BY FirstName
ORDER BY FirstName
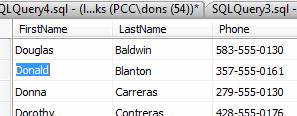
UPDATE from VIEW
Just as we can UPDATE data in a Table, a View can
be used as well. Building on the previous example, the statement can be
modified into an UPDATE as shown below:
UPDATE TestView
SET FirstName = ‘Test’
WHERE FirstName = ‘Douglas’ AND LastName = ‘Baldwin’
Views are UPDATE-able as long as the original
statement creating the view did not use a grouping command such as GROUP BY or
Distinct. In addition, derived columns, such as those created with the
functions AVG and SUM cannot be used.
To update from a view using the Management Studio,
right click the view in the Object Explorer and select “Edit Top 200 Rows”.
This will bring up an editable grid just like when working with a Table.
Conclusion
The benefits of using SQL Server VIEWs include the
ability to restrict a user’s access to underlying data, as well as hiding
complex statements so simple result sets can be worked with. The syntax for
creating a VIEW is simple and most all of the usual TSQL commands are
available. If data is to be Updated or Deleted through a view, then aggregate
and grouping statements cannot be used when the view is created.