


In Part IV of this article series, we have seen how to partition an existing table based on certain range of dates.
Part V illustrates how to merge and split existing partitions.
First let us create a database with a table. Then let us insert data and then partition the table.
Step 1
Let us assume we have created the folder, C:\Data2, and the following subfolders. [Refer Fig 1.0]
C:\Data2\Primary
C:\Data2\FG1
C:\Data2\FG2
C:\Data2\FG3
C:\Data2\FG4
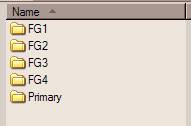
Fig 1.0
Step 2
Let us assume that we have a database, Data Partition DB3, with five different file groups, as shown below.
use master
IF  EXISTS (SELECT name FROM sys.databases WHERE name = N’Data Partition DB5′)
DROP DATABASE [Data Partition DB5]
GO
 CREATE DATABASE [Data Partition DB5]
      ON PRIMARY
       (NAME=’Data Partition DB5′,
        FILENAME=
          ‘C:\Data2\Primary\Data Partition DB5.mdf’,
        SIZE=5,
        MAXSIZE=500,
        FILEGROWTH=1 ),
      FILEGROUP [Data Partition DB5 FG1]
       (NAME = ‘Data Partition DB5 FG1’,
        FILENAME =
         ‘C:\Data2\FG1\Data Partition DB5 FG1.ndf’,
        SIZE = 5MB,
        MAXSIZE=500,
        FILEGROWTH=1 ),
      FILEGROUP [Data Partition DB5 FG2]
       (NAME = ‘Data Partition DB5 FG2’,
        FILENAME =
         ‘C:\Data2\FG2\Data Partition DB5 FG2.ndf’,
        SIZE = 5MB,
        MAXSIZE=500,
        FILEGROWTH=1 ),
      FILEGROUP [Data Partition DB5 FG3]
       (NAME = ‘Data Partition DB5 FG3’,
        FILENAME =
         ‘C:\Data2\FG3\Data Partition DB5 FG3.ndf’,
        SIZE = 5MB,
        MAXSIZE=500,
        FILEGROWTH=1 ),
      FILEGROUP [Data Partition DB5 FG4]
       (NAME = ‘Data Partition DB5 FG4’,
        FILENAME =
         ‘C:\Data2\FG4\Data Partition DB5 FG4.ndf’,
        SIZE = 5MB,
        MAXSIZE=500,
        FILEGROWTH=1 )
Step 3
Let us assume that we have a table on the primary file group. You could create that table by executing the following T-SQL statement.
USE [Data Partition DB5]
go
CREATE TABLE MyTable
       (ID INT NOT NULL,
        Date DATETIME,
        Cost money ) on [primary]
Step 4
Now let us create a unique clustered index on the table by executing the following T-SQL statement.
USE [Data Partition DB5]
go
CREATE UNIQUE CLUSTERED INDEX MyTable_IXC
       ON MyTable(ID) on [PRIMARY]
Step 5
Now let us insert some data onto the table, MyTable, using the following T-SQL statements.
USE [Data Partition DB5]
go
declare @count int
set @count =-25
while @count <=100
begin
insert into MyTable select @count,getdate(),100.00
set @count=@count+1
end
set @count =101
while @count <=200
begin
insert into MyTable select @count,getdate(),200.00
set @count=@count+1
end
set @count =201
while @count <=300
begin
insert into MyTable select @count,getdate(),300.00
set @count=@count+1
end
set @count =301
while @count <=400
begin
insert into MyTable select @count,getdate(),400.00
set @count=@count+1
end
set @count =401
while @count <=800
begin
insert into MyTable select @count,getdate(),500.00
set @count=@count+1
end
Let us query the table using the T-SQL statement shown below.
select * from MyTable
ID          Date                    Cost
———– ———————– ———————
-25         2006-11-09 15:12:01.177 100.00
-24         2006-11-09 15:12:01.207 100.00
-23         2006-11-09 15:12:01.207 100.00
-22         2006-11-09 15:12:01.223 100.00
-21         2006-11-09 15:12:01.223 100.00
-20         2006-11-09 15:12:01.223 100.00
-19         2006-11-09 15:12:01.240 100.00
.
.
.
0           2006-11-09 15:12:01.347 100.00
1           2006-11-09 15:12:01.347 100.00
2           2006-11-09 15:12:01.363 100.00
3           2006-11-09 15:12:01.363 100.00
.
.
792         2006-11-09 15:12:06.270 500.00
793         2006-11-09 15:12:06.270 500.00
794         2006-11-09 15:12:06.287 500.00
795         2006-11-09 15:12:06.287 500.00
796         2006-11-09 15:12:06.287 500.00
797         2006-11-09 15:12:06.300 500.00
798         2006-11-09 15:12:06.300 500.00
799         2006-11-09 15:12:06.317 500.00
800         2006-11-09 15:12:06.317 500.00
Now let us query the partition information of this table by executing the following query.
select * from sys.partitions where object_name(object_id)=’MyTable’You can see the result as shown below [Refer Fig 1.1]. It is obvious that all of the 826 rows are in the same partition.

Fig 1.1
Step 6
Partitioning of the tables depends on the partition range defined by Partition Function. Let us assume that we are going to partition the table into four parts, onto four different file groups.
use [Data Partition DB5]
GO
CREATE PARTITION FUNCTION [Data Partition Range](int)
        AS RANGE LEFT FOR VALUES (100,200,300)
When we use LEFT clause in the range, the first partition could hold values from negative infinity to 100, the second partition could hold values from 101 to 200, the third partition could hold values from 201 to 300 and the fourth partition could hold values from 301 to infinity or whatever the max range of the integer value.
When we use RIGHT clause in the range, the first partition could hold values from negative infinity to 99, the second partition could hold values from 100 to 199, the third partition could hold values from 200 to 299 and the fourth partition could hold values from 300 to Infinity or whatever the max range of the integer value.
Execute the following query to see the partition information.
SELECT * FROM sys.partition_range_valuesStep 7
Partition Function is not useful, unless it is associated with the proper file groups that we have created.
Let us assume that we are going to use file group [Data Partition DB5 FG1], [Data Partition DB5 FG2], [Data Partition DB5 FG3], [Data Partition DB5 FG4] for the partition table that we are going to create. This can be created as shown below.
USE [Data Partition DB5]
go
CREATE PARTITION SCHEME [Data Partition Scheme]
        AS PARTITION [Data Partition Range]
        TO ([Data Partition DB5 FG1], [Data Partition DB5 FG2], [Data Partition DB5 FG3],[Data Partition DB5 FG4]);
Step 8
Now, let us move the table to the new partition by using the following TSQL command.
Drop index MyTable_IXC on MyTable with (Move To [Data Partition Scheme] (ID) )Now, let us query the partition information by using the following query.
select * from sys.partitions where object_name(object_id)=’MyTable’You can see the result as shown below [Refer Fig 1.2]. It is obvious that all of the 826 rows are spread across all four file groups, based on the partition range.
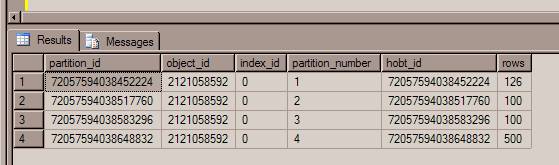
Fig 1.2
Now we have MyTable partitioned in to four different partitions. It is time to merge the first two partitions.
Merge partition
Execute the following T-SQL statement to merge the first two partitions together.
Alter partition function [Data Partition Range]()
merge range(100)
Now, let us query the partition information by using the following query.
select * from sys.partitions where object_name(object_id)=’MyTable’You will the see the following results showing the merge of partition number 1 and 2. [Refer Fig 1.3]
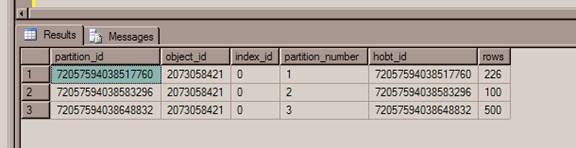
Fig 1.3
Split partition
Execute the following T-SQL statement to split last partition into two partitions.
Alter partition function [Data Partition Range]()
split range(300)
When executed you will get the following error.
Msg 7707, Level 16, State 1, Line 1
The associated partition function ‘Data Partition Range’ generates
more partitions than there are file groups mentioned in the scheme
‘Data Partition Scheme’.
In order to avoid this, we have to add another file group to the database.
Let us execute the below T-SQl statement, which will add a new file group to the database.
Alter database [Data Partition DB5] add FILEGROUP [Data Partition DB5 FG5]
go
alter database [Data Partition DB5]
ADD FILE
       (NAME = ‘Data Partition DB5 FG5’,
        FILENAME =
         ‘C:\Data2\FG4\Data Partition DB5 FG5.ndf’,
        SIZE = 5MB,
        MAXSIZE=500,
        FILEGROWTH=1 )
TO FILEGROUP [Data Partition DB5 FG5]
Go
Now let us try again to split the partition range by executing the following T-SQL statement.
Use [Data Partition DB5]
go
ALTER PARTITION SCHEME [Data Partition Scheme]
NEXT USED [Data Partition DB5 FG5]
GO
Alter partition function [Data Partition Range]()
split range(500)
Note: We should make SQL Server aware that it should use the next partition when it is splitting. The clause NEXT USED does that.
Now, let us query the partition information by using the following query.
select * from sys.partitions where object_name(object_id)=’MyTable’You will the see the following results showing the split of partition number 3. [Refer Fig 1.4]
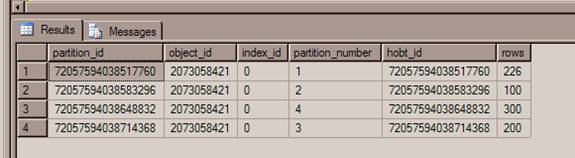
Fig 1.4
You can see that any ID values between 300 and 500 are moved to partition 3 and any ID values more than 500 are moved to partition 4.
Conclusion
Part V of this article series has illustrated how to merge and split existing partitions.