


The first step that one must do to create a link to or export data from DB2 is to establish to proper connectivity.
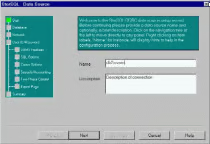
This supplimental artical will show you how to configure StarSQL 3.0 by StarQuest. It is a good idea if you are the DB2 admin
when installing the product to run a custom installation and install StarAdmin also. StarAdmin will give you the access to easily bind the packages to DB2. If you are using
StarSQL to connect to DB2 for the purposes of DTS or linked servers, make sure that you install it on the server and configure it exactly as you did on your workstation. StarSQL will not work with the Windows 95 or 98 operating system.
I choose StarSQL 3.0 for the following reasons:
- Ease of configuration.
- Supportibilty by Microsoft of DTS and Replication
- Fits seamlessly into DTS and Linked Server.
Another consideration you must have is the datatypes. You will need
to check the datatypes on DB2 and SQL Server to make sure that they will
support each other. The chart below covers covers the supportibilty of the datatypes (see books online for more information).
- Enter the server name of your DB2 server and leave the default package collection name as STARSQL (see figure 2).
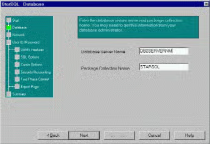
FIGURE 2 (click for full size) - Select the method of connection you wish to use to link the SQL Server to DB2 for the Network Option (see figure 3). If using TCP/IP, select the IP Address for the host name and port (see your DB2 Admin for port information).
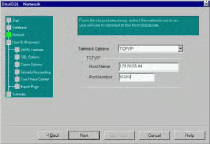
FIGURE 3 (click for full size) - Enter your DB2 or RACF user id and password
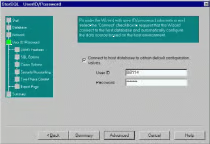
FIGURE 4 (click for full size) - Click on advanced (which replaced next). If you’d like to filter which DB2
database schemas will be visible to the user, check the databases you’d like to see in the Catalog Filters section. Hint : If you see schemas listed here, you know your conectivity is good to the DB2 server. Click summary after you’ve completed this option. - Verify the settings on the summary screen and click OK.
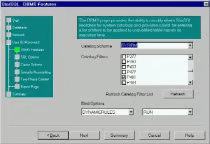
FIGURE 5 (click for full size)
You are now ready to configure SQL Server 7.0 to link to DB2 and import data via DTS. If you need any help, I’ve found Starquest’s technical support to always answer on the first ring and be very helpful. As always, feel free to contact me by email if any problems occur.