


Introduction
SQL Server 2008 includes a powerful data integration and
transformation application called SQL Server Integration Service (SSIS). One
of the main functions of SSIS is to move data into and out of SQL Server. The
external data source can exist in almost any format, another database, Excel
sheet, XML file, or a plain text file to name just a few. Not only can data be
moved from source to destination, but it can be manipulated and changed as it
moves. These changes can be simple transforms such as rounding decimal places
or capitalizing the first letter of names, to extremely complex data
orchestrations. While the list of tasks SSIS can do is almost never ending, this
article will focus on importing a text file into a standard SQL Server database
table. In the next article, we’ll expand on this example and loop through an
entire directory folder of text files and import them into SQL Server
automatically as a nightly reoccurring job.
BIDS
SQL Server Integration Service applications are created in
BIDS (Business Intelligence Development Studio). BIDS is a Visual Studio tool
included with SQL Server. In addition to creating SSIS packages, BIDS can be
used to create applications for SQL Server Reporting Services and Analysis
Services. Just like the SQL Server Management Studio is the “Swiss army knife”
of SQL, BIDS is an all encompassing development tool for creating import,
export, and data manipulation routines.
Setup
In this first exercise, we’ll import a text file of contact
names into SQL Server. No looping or programming, just a straightforward file
import example. I’ve created a text file of five contacts that are pipe
delimited as shown below.
Gustavo |Achong |1970 Napa Ct. |London
Catherine|Abel |9833 Mt. Dias Blv.|London
Kim|Abercrombie |7484 Roundtree Drive|London
Humberto|Acevedo|9539 Glenside Dr|London
Pilar|Ackerman |1226 Shoe St. |Oxford
Each row has a First Name, Last Name, Address, and City. The
pipe symbol ( | ) separates each column of data. The pipe is not required for
SQL Server Import Service. Any delimiter can be used including the common
formats of Tab, space, and comma. I’ve copied the above contacts into notepad
and saved them on my C:\ drive. In SQL Server, I’ve created a database called
“Test” and a Contacts table using the following TSQL:
CREATE TABLE [dbo].[Contacts](
	[FirstName] [varchar](50) NULL,
	[LastName] [varchar](50) NULL,
	[Address] [varchar](50) NULL,
	[City] [varchar](50) NULL,
	[State] [varchar](50) NULL,
	[Zip] [varchar](50) NULL
) ON [PRIMARY]
This new Contacts table includes fields called “State” and
“Zip” which do not appear in our text file. SSIS will ignore these columns
during our import.
BIDS
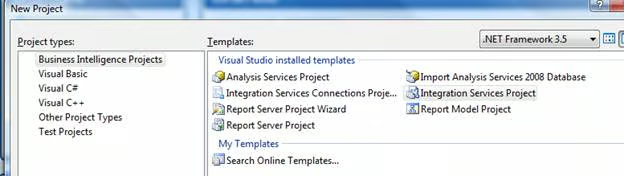
To begin the example, open BIDS in Windows by selecting
Start, All Programs, Microsoft SQL Server 2008, and then Microsoft SQL Server
Business Intelligence Development Studio (BIDS). An empty BIDS shell will
open. From the top menu, select File, New Project. In the New Project dialog,
select Business Intelligence Project, Integration Service Project, and then
specify a project name and directory. The location does not need to be the
same as the text files we’re going to import.
Clicking OK will bring up a blank designer. Notice that the
top of the designer has four tabs, Control Flow, Data Flow, Event Handlers, and
Package Explorer. Routines created in SSIS are called packages, and the
Package Explorer is used to navigate them. The tabs we’ll be focusing on in
this article are the Control and Data Flow tabs. A “Control” item is an object
container that gives our routine structure, functionality, or constraints. A
Data Flow item moves and or transforms data values. I think of these two tabs
in the same way we separate GUI code from business logic. The Control defines
the “what” (FTP Task, Import Task, Send Mail Task), the Data Flow specifies who
and how.
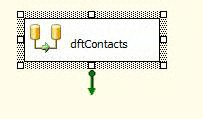
From the Control Flow Items menu, drag a “Data Flow Task”
object onto the designer. A Data Flow Task moves data from one source to
another. I’ve right clicked the task and renamed it to dftContacts as shown
below.
Double click the task to move into its Data Flow
properties. Inside this data flow, we’ll define our text file source and SQL
Server table destination as well as which columns of data to move where.
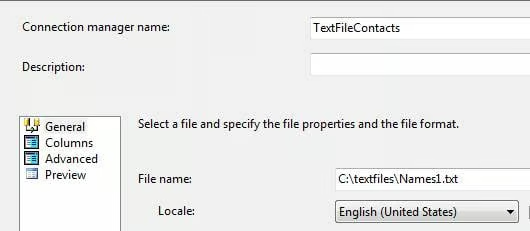
From the left Data Flow Services menu, drag a “Flat File
Source” object onto the Data Flow surface. Double click it to open its
properties. Click the New button to create a new connection to the text file.
In the Flat File Connection Manager editor, I’ve named mange “TextFileContacts”
and then browsed to the file location on the hard drive.
Click the Columns menu item and then specify a | (pipe) as
the Column Delimiter. Clicking the refresh button will display the five rows
of data from the text file.

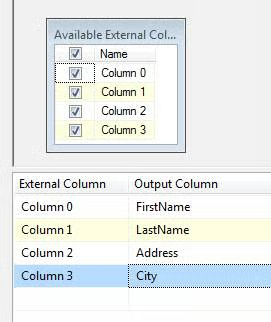
Click OK to return to the Flat File Source Editor. Next, we
will give the columns a header name. Although this isn’t required, it makes
the package more readable. Click “Columns” from the left menu. In the Output column,
change the names from Column 0, 1, 2, 3 to FirstName, LastName, Address, and
City as shown below and then click OK.
Our flat file import object is now complete. Next, we’ll
specify our SQL Server table destination. From the left menu, in the Data Flow
Destination area of the toolbox, drag a “SQL Server Destination” onto the Data
Flow work area. Next, click the Flat File Source and drag the green arrow from
it to the new SQL Server Destination.
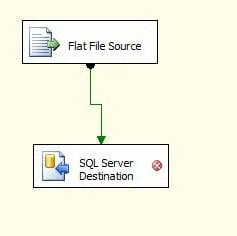
This specifies the data will flow from the Flat File to the
SQL Server destination. Notice the red X in the destination icon. This means
the object is not configured. Double click the SQL Server Destination object
to open its properties. Click New on the Connection Manager, and again New for
the Configure OLE DB Connection Manager. Next, specify your SQL Server name,
authentication method, and destination table name. Click the “Test Connection”
button to confirm the connection is valid. Click OK and OK again to return to
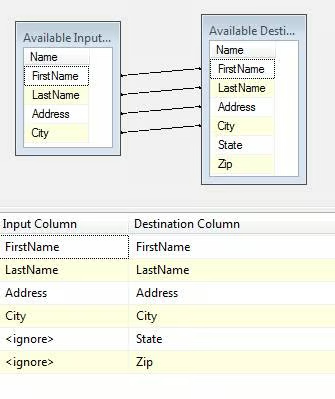
the SQL Design Editor. Next, select the newly created Contacts table from the
“Use a table or view” drop down list. Because we have more columns in the SQL
Server table than in the Flat File source, click “Mappings” from the left menu
to verify the columns will flow correctly. The source and destinations should
match with the SQL Server table State and Zip columns being ignored because
there isn’t any import data for them in the flat file source as shown below.
Click OK.
The package is now complete. Click the save icon from the
top menu. To run the package, click the green triangle from the top menu. The
package will execute in debug mode. As each object completes successfully, it
will turn green. The data rows from the flat file have now been transferred
into SQL server.
Conclusion
The SQL Server Integration Service (SSIS) is a full featured
import, export, transformation manager. After only a short amount of practice,
complex jobs can be easily created using the graphical interface of BIDS. In
the next article, we’ll expand on this example, looping through an entire
directory folder of text files and importing them into SQL Server automatically
as a nightly reoccurring job.